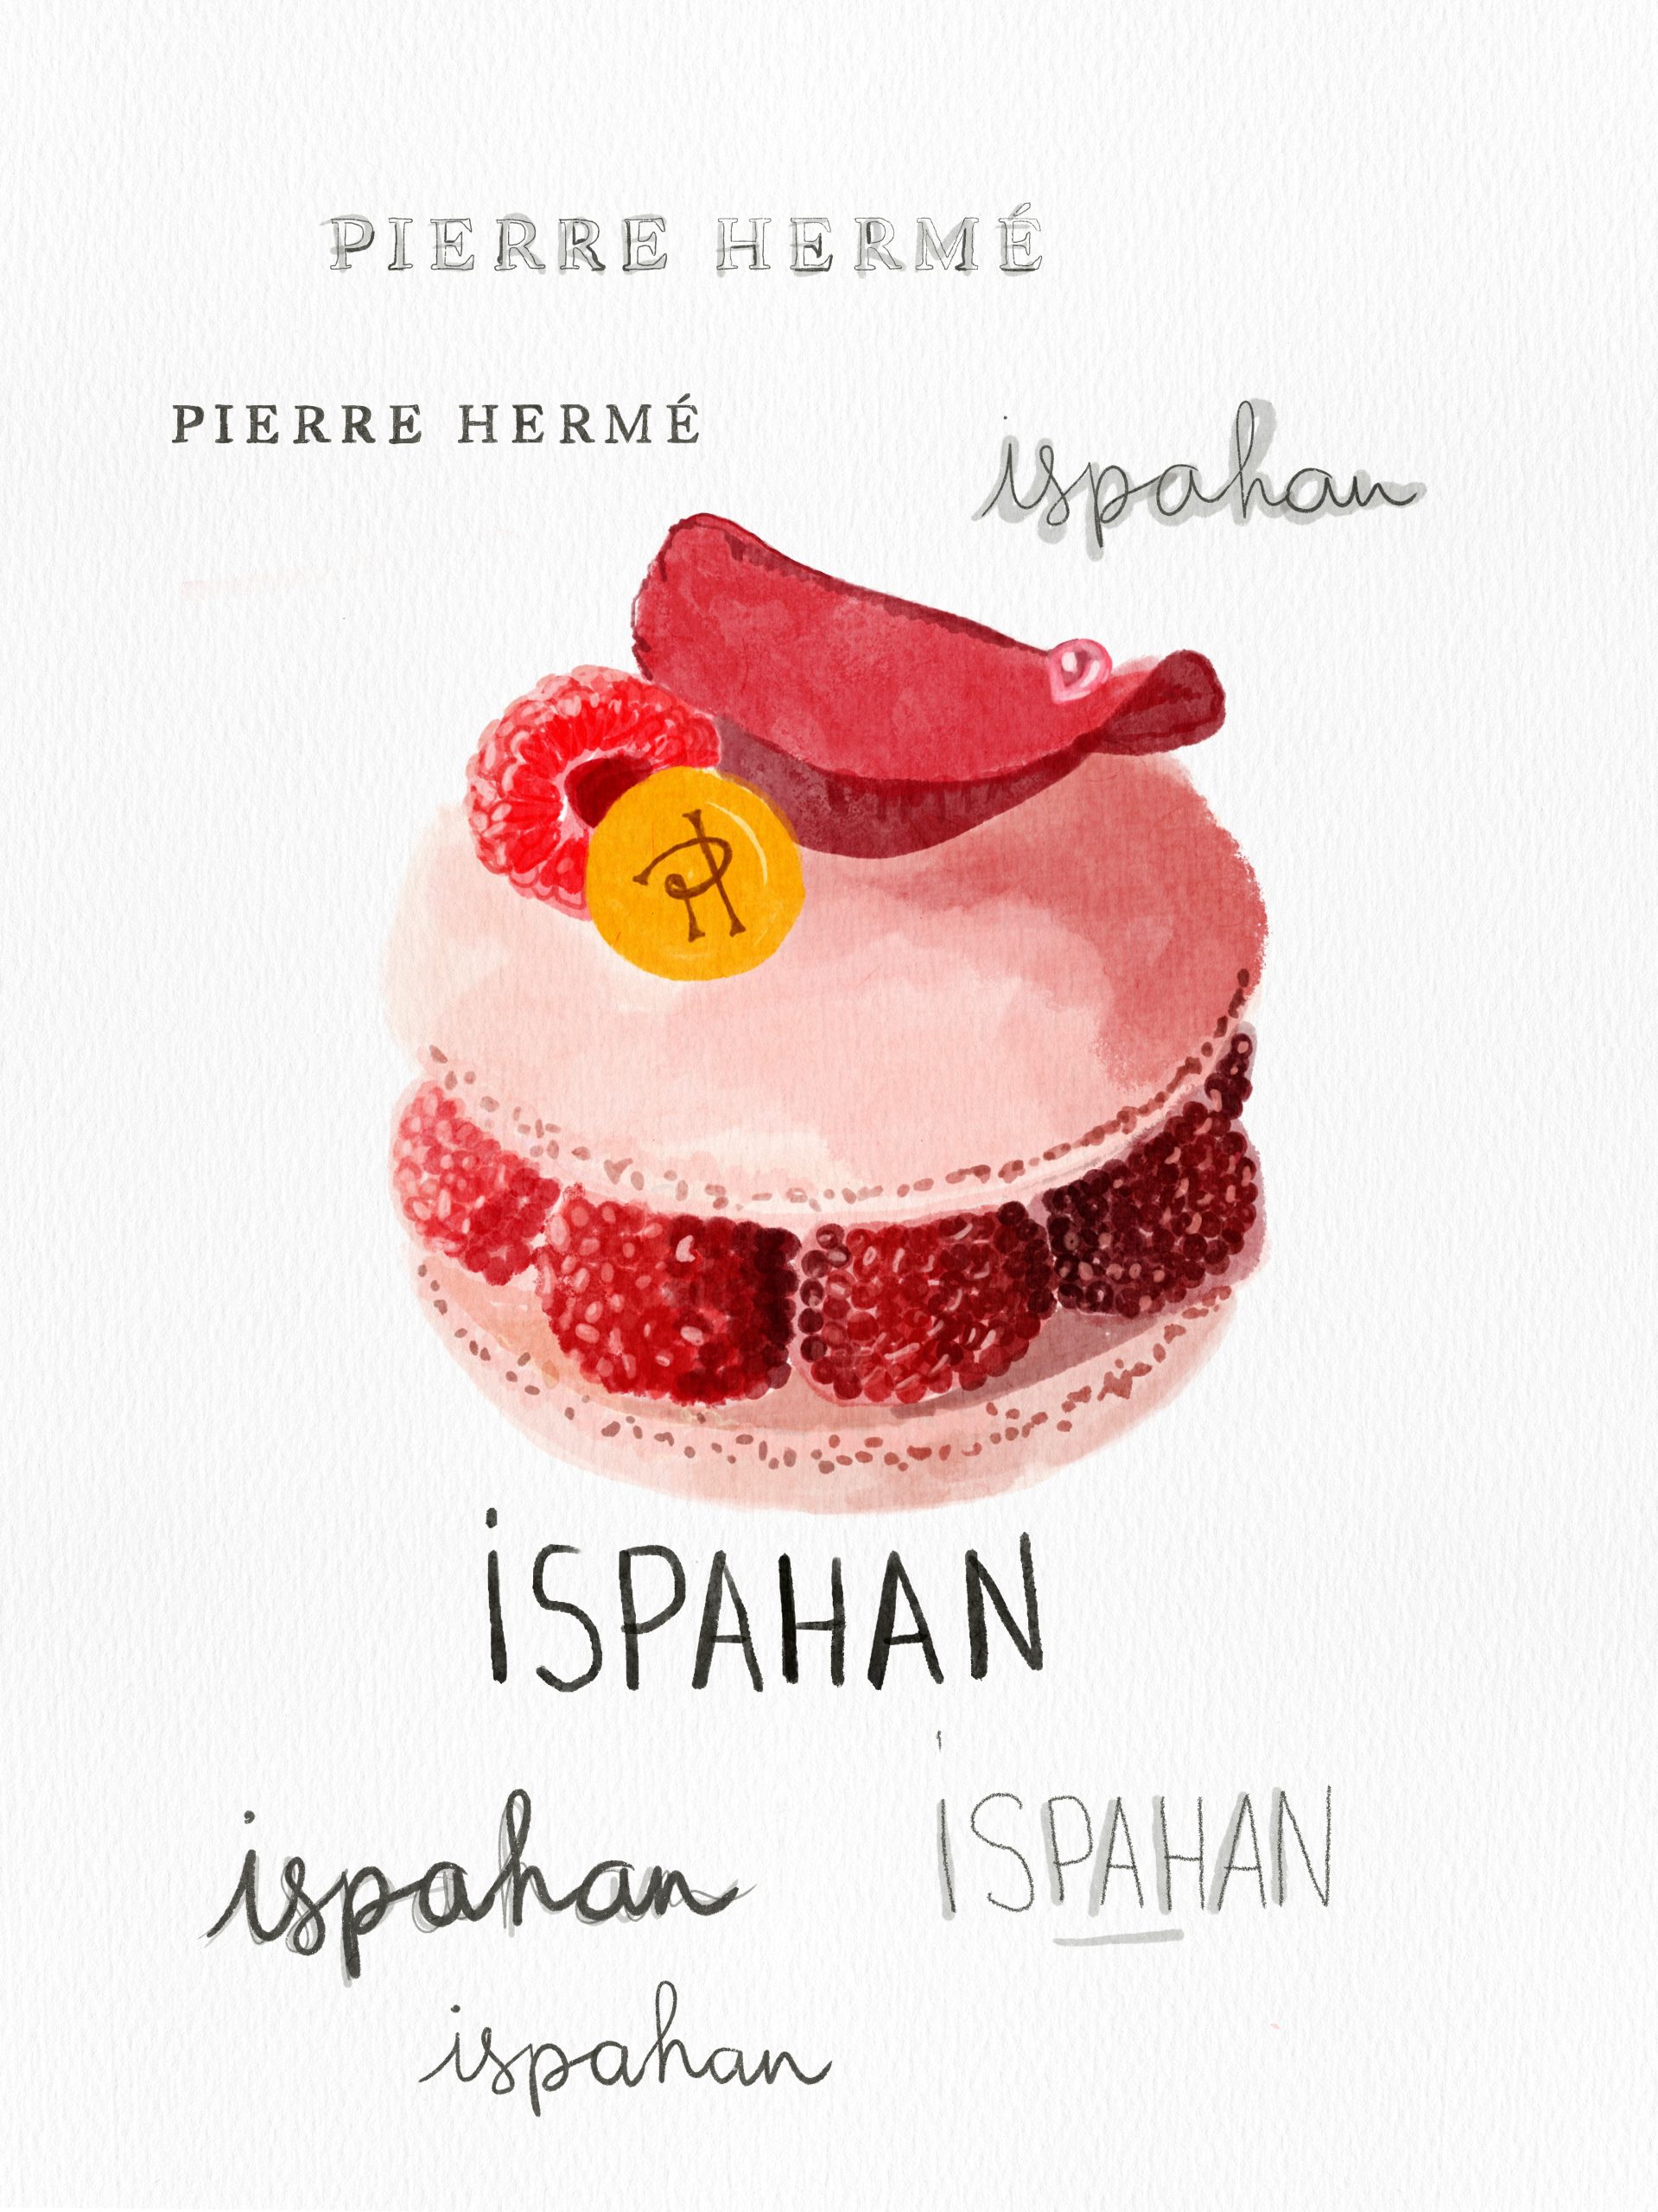
Tag: French pâtisserie

  • Éclairs au chocolat

    Éclairs au chocolat

    [Chocolate eclairs]

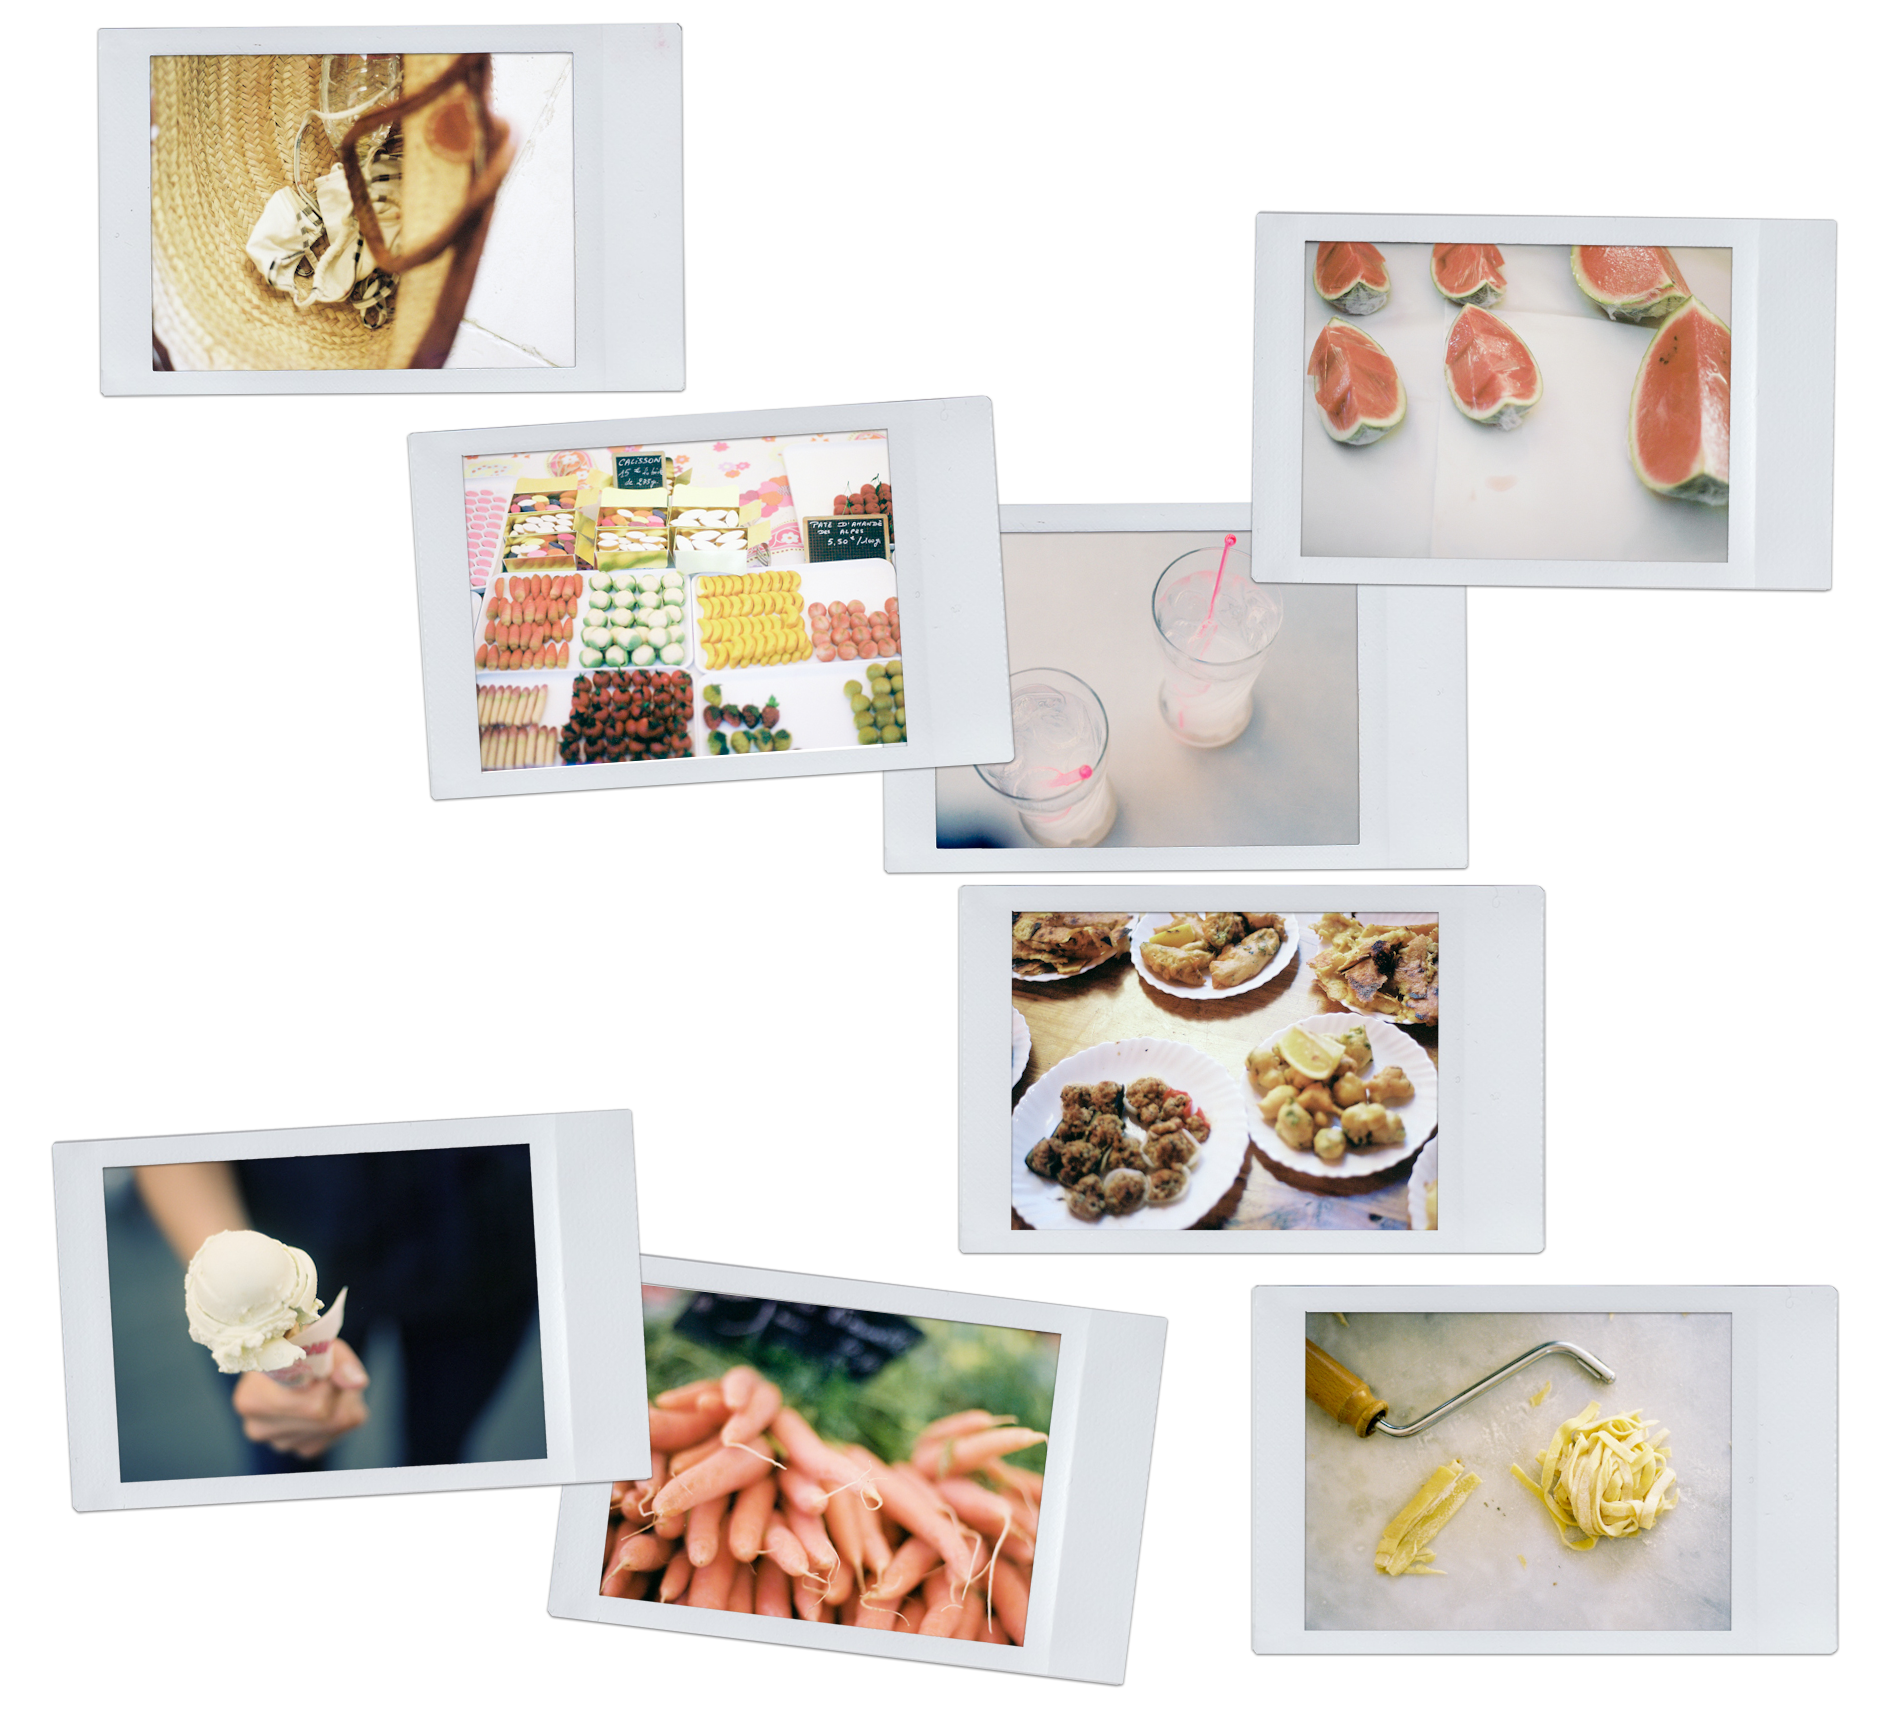
    When trees are shaped like hearts; and breakfast means just-brewed coffee slash bike ride slash jonchée eaten as soon as I’ve taken my gum boots off.

    And we run barefoot in fields of frost. And the grass glows to the moonlight in a way only gems can. With la grande ourse [the great bear] and a feral cat as our only companions for this aimless journey.

    We breathe the cold air and feel alive. We kiss and feel warmer. It’s the very instant that matters.

    Yes, at times, it’s ok to loose track. Of time, of purpose…
    Days are long. And nights too.

    Crossing off to-dos like there is no tomorrow, because, after all, holidays are made of no-tomorrows.

    Today, we made éclairs, à la Fauchon. It was fun, and messy. The kitchen ended up looking à la Fauchon too. Stripped with white and black fondants.

    It’s fine, really. It is.

    We licked our fingers. And ate an éclair, of the à la minute kind. Then scrubbed the counter until it no longer felt sticky. Just our mouths did. And that is a good sign, by all accounts.

    Éclairs au chocolat
    Inspired by Fauchon.

    If you can make choux paste and crème pâtissière, then it really all gets down to glazing an éclair with fondant, then piping straight lines of a coloured fondant. This can be made with either a piping bag or a paper cornet (the latter being my favourite, some things will never change, trust me).

    The only trick to know is to make sure both fondant have the same temperature and texture.
    For the chocolate fondant, I simply added a bit of cacao powder until it looked dark enough. Then mixed in 30°B syrup until the texture seemed just right.

    I guess it’s a bit of a trial and error at first. But it’s ok. We love sticky fingers around here.

    And since I’m at it, fondant is a kind of crystallised sugar that can be found in fancy shops. In case it’s nowhere to be found, try mixing icing sugar and a tiny bit of water…

    Both the choux paste and crème pâtissière can be made in advance. Since the paste is frozen, you can make it up to a week before. And the cream can stay in the fridge for a couple of days.
    However, once the éclairs are filled, they’re best eaten in the day.

    Éclairs au chocolat

    makes 12 éclairs
    for the choux paste
    one recipe of choux paste
    one egg
    , for eggwash
    butter, to grease the baking tray

    Make the choux paste according to the recipe.
    Pipe it onto a baking tray lined with baking paper into logs using a 15mm nozzle; then freeze. Cut into 13cm-long éclairs and arrange on a buttered tray. And bake until golden brown (tips on how to bake choux paste here).

    For the crème pâtissière

    250g milk
    100g cream
    2 egg yolks
    30g caster sugar
    15g cornflour
    100g dark chocolate

    Bring the milk and cream to the boil. In a bowl, mix the egg yolks with the sugar and cornflour. Pour the boiling liquids over the yolks, whisking as you go. Then place back into the pan and cook – whisking at all times – until boiling.
    Transfer to a bowl and add the chocolate. Handblend and clingfilm to the touch. Chill.

    Using a small nozzle, fill the eclairs. And set aside.

    For the glaze
    fondant
    cacao powder
    30°B syrup
    (100g caster sugar + 100g water, brought to the boil, then chilled)

    Melt the fondant over a bain-marie or in the microwave. Divide into two heatproof bowls. Add cacao powder to colour one of the batches into a dark brown fondant.

    Reheat both fondant over a bain-marie or in the microwave, until it reaches 30-35°C. Adding a little syrup to make it runny enough. Then using a small spatula or your finger, glaze the top of the éclair.
    Immediately pipe straight lines of dark fondant, making sure the tip of your bag or cornet is cut small enough (perhaps 2mm, the fondant will spread). Then run your finger along the éclair to clean up it sides and twirl the end of the piped lines.

    Repeat with the remaining éclairs. They will keep in the fridge overnight, although they’re best eaten on the same day.

  • Le fondant au chocolat

    Le fondant au chocolat

    [The ultimate chocolate fondant]

    In London, we’ve had winter in July. Air damp with rain. Kitchens warm with soup on the stove. Oven smelling like chocolate cake.

    And now, in the south of France, we’re having summer in September. Walks through the markets. Sirops d’orgeat at the terrace of the village café. Afternoons at the beach. Ice-cream, in a cone, please. Flip-flops at the feet. Deep-fried is a must, especially when it involves fleurs de courgettes. Watermelon; full-stop.

    It seems that whenever I come down here it’s summer. A summer of the out-of-season kind.

    It also seems that whenever I’m down here, I always return to the same cake. A cake of the homecoming kind.

    It certainly is my go-to. Because, let’s be honest, we all need one.

    One we make on Mondays. One we slice when still warm and slightly runny for a late afternoon indulgence. One we have for breakfast – the day after – cold from the fridge and dipped into the latte we overlooked as we were flipping through the pages of the newspaper. One we finish on Wednesdays after a dinner made of crusty baguette with a side of sliced tomatoes in their juices; perhaps with a scoop of yoghurt ice-cream.

    This cake is dark and dense. The very definition of a fondant.

    And since we’re at it, I shall let you know that what we – French – call fondant is somehow different to the fondants I’ve been known to bake à la minute for the restaurant.
    In fact, if you’re thinking about small little cakes with a melted chocolate centre, we call them coulants in good old France.

    So please, mind your French, will you 😉

    Fondant au chocolat

    Fondant au chocolat
    Adapted from Pascal Lac.

    I’ve told you about this cake before. It is, as I’ve mentioned above, a keeper. If you’re after a moist chocolate cake, then this is the one.

    Plus, it’s damn easy to make. Just chocolate, butter, eggs, sugar, and flour.
    Oh yes, ok, eight eggs and four hundred grams of sugar. Just forget about this and bake it in a 28cm pan for thinner wedges.

    It is worth it!

    When it comes to the chocolate, I like to use a slightly bitter, most possibly 70%. And I have to admit Valrhona Guanaja is especially great for cakes of all kinds.

    The only tricky – and when I say tricky, I mean very merely – step is to bring the eggs and sugar mixture to room temperature-ish over the heat.
    You can either do it straight over the gas, making sure to mix at all time while turning the bowl to ensure heat distribution. Or do it over a water-bath (which should not stop you from mixing and turning the bowl!).

    This step is done, as we say in French, to casser le froid [break the coldness]. And it will incorporate a little air in the eggs.

    Fondant au chocolat

    Makes one 24 to 28cm cake.

    200g dark chocolate
    240g butter
    8 eggs

    400g sugar
    130g flour

    Preheat the oven to 170°C, and generously butter a 24 to 28 cm springform pan.

    In a bowl, melt the chocolate and butter.

    In a heatproof bowl, mix the eggs and sugar – using a whisk – and place over medium heat (or as said above, on a water bath). Keep on mixing until not cold anymore. It shouldn’t be hot either.
    Pour the chocolate over the egg mixture, and mix to homogenise. Sprinkle the flour over and using a rubber spatula, gently incorporate it until just smooth.

    Pour the batter into the prepared tin and bake for 30 to 40 minutes (if you’re using a smaller tin) until just set.

  • Mastering crème pâtissière, step by step

    Mastering crème pâtissière, step by step

    It was a day at the end of September. A couple of years ago. I put on my pied-de-poule trousers for the first time since the internship I had done the summer before at Pierre Hermé.

    I walked up the stairs, to the biggest, most beautiful kitchen I had ever seen, with the aim to make my biggest, most beautiful dream come true.

    A dream that apparently involved cooking 12L of crème pâtissière. And when I say 12L, I really mean 12L of milk. So if you had up the other ingredients, it makes around 16kg of silky smooth vanilla goodness.

    As a matter of fact, by seven am, the hair, that took me an hour to tame at three in the morning, was wild again. And my cheeks were the colour of bike rides in the wind.

    I don’t want anyone to get hurt by making crème pâtissière, so I’ll just give you the half-a-litre recipe. Which happens to be just enough to fill a tart or a handful of choux, plus a couple of tablespoons for personal consumption.

    This recipe is a basic crème pâtissière. A very simple cream made of milk, vanilla, egg yolks, cornflour, and caster sugar.

    As usual, I can only advise you have all of the ingredients ready and measured before you start. Along with the equipment.

    500g milk
    one vanilla pod
    3 egg yolks
    60g caster sugar
    40g cornflour

    one medium saucepan
    two small whisks
    a fine chinois or sieve
    two maryses
    a small bowl
    a shallow plastic container

    01.

    Place the milk and split vanilla pod into a medium saucepan and bring to the boil, whisking every now and then.

    02.

    In a small bowl, mix the egg yolks and sugar with a whisk, until fully combined. This prevents the caster sugar from reacting with the thin skin of the yolks, which would create some small lumps.
    Add the cornflour and incorporate.

    03.

    Temper the egg yolk mixture with the strained milk (to get rid of the vanilla pod). Whisking as you do so.

    04.

    Pour back into the pan – off the heat – whisking continuously. Then over soft heat, bring to the boil, whisking at all time.

    05.

    As soon as the mixture reaches the boiling point and starts to thicken, keep on cooking and whisking for a minute or two.

    06.

    Pour and scrape into a plastic container.
    And clingfilm to the touch to avoid the formation of a skin. Chill for an hour.

  • PS. Une brioche avec un peu plus de beurre

    PS. Une brioche avec un peu plus de beurre

    [PS. A brioche with a tad more butter]

    London, sometime in April.
    I made a brioche. In five minutes; and five days. We woke up early to shape and proof the dough. Well, I did. A couple of hours later, we sat at the table, with our eyes still plein de sommeil [full of sleep].

    And we had a slice each. With plenty of strawberry jam. And a cup of coffee.

    I then proceeded to braid my hair. And for a walk we went. The trees were snowing and no matter how long I will live in London, my dreams will always float higher with the April snow.
    Another coffee was taken, at a café this time; perhaps in Fulham or Clapham. I can’t remember.

    But I recall a phone conversation with my mum. About the brioche. And how she should make it.

    France, sometime in May.
    I flew in wearing UGG boots and a wool scarf. But as we reached the car on the airport parking lot, I switched for those leather sandals I’m so fond of.

    We arrived home. And dropped the suitcases somewhere in the living room.

    Without judging unpacking necessary, we headed to the kitchen. An apron got wrapped around my waist, flour got weighed out, dough was put away in a bowl.

    And before we knew it, we made a brioche. In five minutes; and a five days. Oh and five hundred grams of butter. Perhaps with a couple of hidden chocolate squares. Yes, perhaps…
    It tasted just as good. If not better.


    And just so my mum doesn’t have an excuse not to make brioche, here is the recipe in French. Oui!
    Accents included and all. Mum if you knew how long it takes to add accents when you have an English keyboard, you’d already be making brioche as you read this.

    Dans un bol, fouetter le beurre fondu, l’eau, le sel, les oeufs et le miel. Ajouter la farine et la levure. Mélanger à la cuillère en bois jusqu’à obtention d’une pâte souple et homogène.

    Recouvrir le bol avec un torchon et laisser pousser à température ambiante pour un peu plus de 2h.

    Une fois la pâte ayant doublé de volume, mettre le bol – toujours recouvert d’un torchon – au frigo pendant au moins 24h.

    Le lendemain – ou n’importe quand dans les cinq jours qui suivent – beurrer un moule à cake génereusement. Prélever 450g de pâte du pâton. Puis la diviser en quatre. Fleurer (fariner) le plan de travail et bouler (former des boules) chacun des morceaux.

    Placer les boules dans le moule préalablement beurré et faire pousser pendant 1h30.

    Pendant ce temps, préchauffer le four a 190°C. Battre un oeuf pour la dorure. Dorer la brioche au pinceau. Et cuire pour 40 à 50 minutes. Démouler et laisser refroidir sur une grille.

  • Chouquettes

    Chouquettes

    [Sugar choux puffs]

    I could tell you how my dad would take me to the boulangerie after school, as I was smaller than the smallest tree of your garden. In fact, I could barely walk. But making my way to the bottom of the crumpled paper bag handed to me by the lady at the counter seemed easy.

    That paper bag could hold a dozen of chouquettes. Or as I would call them, chouchou. Possibly, a made-up word from my dad.

    Oh yes, I could tell you how my hands would be sticky. And my mouth most likely surrounded by pearls of sugar.

    But instead, I will tell you about what happened a few days ago.

    I brought milk and butter to a rolling boil. With a pinch of salt, just so; because, that’s the way to go. I added a good amount of flour. Off the heat, it goes without saying (and yet, here I am). I placed the pan back over the gas and mixed it with a wooden spoon until it was just dry enough.
    I transferred it to the bowl of my stand-mixer; although arms and a spoon would do a fine job too. And add the eggs, one at a time. Until it was just wet enough.
    I piped. Without a nozzle, because they all seem to be in London. And I am not.
    I brushed eggwash. I scored the top with a fork. Dipped in the remaining egg.
    I sprinkled sucre casson [pearl sugar].
    I baked. And poured us a glass of white wine. Or perhaps it was a rosé.

    And then, we ate them. Slightly warm. And guess what? Sticky hands and sugar around the mouth are a must.

    Just like they used to be. Just like they always will.
    Which reminded me about this sentence from one of my very favourite books: la contemplation de l’éternité dans le mouvement même de la vie [the contemplation of eternity within the very movement of life].

    Chouquettes
    I think there are roughly as many pâte à choux recipes as there are pastry chefs. I remember a place where a mixture of milk and water was used. Sometimes, they would add a pinch of baking powder. Or some sugar.

    My recipe possibly originated from the one we used at school. Except, it called for water only. And perhaps, a touch more flour and less butter.
As I went by, I switched the water for milk. Full-fat, please. Added an extra knob of butter. A pinch of salt. And reduced the flour to 150g.

    As for the baking method, it’s the one Pascal Lac taught me. A foolproof method that worked even in the most sophisticated English ovens. Or failing that, the most plastic toy-ovens at home.

    Basically, you preheat the oven to 250˚C. Quickly get the trays inside. And just as the oven records 250˚C again (the temperature will drop slightly as you open the door), turn the oven off. For 15 to 18 minutes, until the temperature reaches 160-180˚C; at which point, the choux should be puffed up and yet still pale in colour. Then, oven set on 170˚C, without fan, dry them for 10 to 15 minutes, until nice and golden; and making sure you keep the door slightly open with a wooden spoon to let any steam escape.
    However, feel free to bake them all the way at 200˚C if that works better for you. But I’m warning you: an oven has never failed me with this technique.

    Just a note on the eggs. I usually use around 4 eggs and a half. So what I do is to incorporate the first four eggs, then whisk the last one, add a little of this to the dough and keep the rest for a made-up eggwash!

    Chouquettes

    makes 40 small choux (roughly the size of a golf ball*)

    250g milk
    100g butter
    a pinch of salt

    150g plain flour

    4 to 5 eggs, see note above
    q.s. pearl sugar

    Preheat the oven to 250˚C, and lightly butter two baking trays.

    Place the milk, butter, and salt in a saucepan. Bring to a rolling boil over low heat – you want the butter to be fully melted before the milk boils. Take the pan off the heat and add the flour all at once, mixing as you go until combined.
    Return to the heat. And using a wooden spoon, mix until a thin crust appears at the bottom of the pan. This shows that the dough is dry enough. It should not be sticky.

    Transfer to the bowl of a stand-mixer and allow to cool for 2 to 3 minutes. Then using the paddle attachment, add the eggs one at a time on medium speed until fully incorporated.
    Scrape into a piping bag, fitted with a 12mm nozzle. And pipe little balls, around 3cm wide and 2cm high.

    Brush with eggwash, making sure to smooth the tops. Then, dip a fork into the eggwash and score the top of the choux.

    Sprinkle with pearl sugar.

    Place the trays in the oven. As fast as you can. Really. Trust me, oven temperatures drop so damn fast. Then keep an eye on your thermometer and the second it says 250˚C again, turn the oven off.
    After 15 to 18 minutes (see note above), turn the oven back on to 170˚C, without a fan. After a few minutes, keep the oven door slightly open by sliding the handle of a wooden spoon inside.

    The choux are ready when golden-brown and not too moist inside**.

    * Disclaimer: I have never played golf in my life. Even though I must admit, I really wanted too as a child. So much in fact, it’s now affecting me as I’m using a golf ball as a unit!

    ** Even now, I always test them (and by test, I really mean eat one) every two minutes past 10 minutes at 170˚C.

  • Five-minute brioche

    Five-minute brioche


    When I mentioned the five-minute brioche, I forgot to say it’s more of a five-minute and five-day brioche.

    Five days where the blossoms turned into snow. Five days where I got less sleep than what a normal night means to you. Five days where everytime I came home, I opened the fridge to imagine that bubbly dough turn into brioche.

    And then on the night before the fifth day, I set my alarm to eight am; two hours later than a day on. Still dizzy from a sleep overdose, I walked to the kitchen. Fleurer le marbre [sprinkle the marble with flour]. Couper la pate [cut the dough]. Bouler [make balls]. Faire pointer [proof]. Et se recoucher [and go back to bed].

    This, my friends, is the recipe for happiness. Especially, if I then braid my hair and spend the day with someone I love.

    A couple of hours later, we slowly emerged from that broken night – or more accurately, morning nap; a concept that I should put to practice more often.

    The loaf went in the oven. And then got sliced, topped with the strawberry jam he made last week – with the somewhat bland berries I was a little too excited with at the market – and then eaten in bed, with the necessary dose of good tunes and the occasional sun peaking through the window.

    It felt like a Sunday. With all the trimmings, bar the messy kitchen. And, no matter how much I love to get my hands dirty by kneading the hell out of a sticky dough until it becomes smooth, it seemed appropriate to take a shortcut this time.

    Even more so that this brioche proved the die-hard French that I am wrong.

    First came Dan. And his focaccia. Almost no-knead. And almost more delicious than any bread I’ve ever tasted. Then came the no-knead bread that got everyone crazy. And now, Zoë.

    So as much as it hurts me to say it, it is possible to make brioche in a matter of seconds. In one bowl. With one wooden spoon.

    Brioche en cinq minutes
    Adapted from Zoë François and Jeff Hertzberg’s Five minute bread.

    I once read somewhere that in order to make a good brioche you need time. I think it was actually mentioned as part of the ingredient list, which I thought was clever as I remembered the hours spent kneading – by hand – a three-kg batch at school.

    And while I love the process, I must admit it does feel good to – every now and then – take the easy option. It says five minutes. But it really is less than that.
    Butter gets melted. And mixed with water, eggs, honey, and salt. No sugar. Just honey, which being inverted sugar – kind of natural trimoline – helps the brioche to stay moist after baking.
    Flour and yeast get incorporated. And the dough is left outside to proof. Only to be, later, chilled; for a day or two. Or in my case, five.

    As a side-note, I do think this recipe could take more butter. Possibly twice more. Possibly because I’m French. Possibly something I will try and report. Which will also allow me to show you how to bouler une pâte [shape the dough into a ball], because – let’s be honest – I’m not sure it translate into words.

    EDIT 24/07/2011: We made this again, but with 500g of butter instead of the 350g written below. It worked and was, as expected, delicious!

    Five-minute brioche

    makes four loaves

    350g-500g (read EDIT above) butter, melted and cooled down
    350g water
    20g salt
    8 eggs
    170g clear honey
    1kg strong flour
    15g instant yeast

    one egg, beaten, for the eggwash

    In a bowl, combine the melted butter, water, salt, eggs, and honey. Add the flour and yeast. And mix using a wooden spoon until smooth.

    Cover the bowl with a cloth and allow to rest at room temperature for a little over 2h (or feel bad-ass and stick it in a turned-off microwave – make sure you read the note above beforehand though).

    Transfer the cloth-covered bowl to the fridge and chilled for at least 24h or up to five days.

    On the day you’re ready to bake, generously butter a loaf tin and cut 450g off your dough. Then using a scraper – or a knife – divide into four bits. Have some flour handy and gently pat each piece into it. Putting the flour side up – and sticky side down – shape it into a ball using the palm of one of your hands.

    Place the four balls into the prepared tin and allow to proof for 1h30.

    Preheat the oven to 190°C. Brush the top of the dough with the eggwash and bake for 40 to 50min, or until golden brown. Unmould and allow to cool on a wire rack, or not.

  • Charlotte au fromage blanc et aux framboises

    Charlotte au fromage blanc et aux framboises

    [Fromage blanc and raspberry charlotte]

    I haven’t spent much time in a home kitchen – let alone made pastries in a home kitchen – for the past eleven months. That’s what a pastry apprenticeship does to you! And really I must admit I feel a bit lost when all I have on hands are a couple of Pyrex bowls, a hand-held mixer, and an oven.

    But all it took was a holiday in Fouras, at my grand-parents’. I could navigate through this kitchen with my eyes closed. And I did; by the end of the week, we had a nice collection of homemade pastries: a fondant au chocolat, strawberry meringues, a tiramisu, fruit focaccias, and a raspberry charlotte.

    Charlotte is one of those desserts I will never get tired of. Dare I call it my favourite?

    In the summer, I love to make it with whichever berries we have lying around. And when the neighbour, Annie, offered us to come and pick raspberries in her garden, my sister and I probably said the word charlotte in unison.
    It was still early in the evening. Bumblebees doing a last round before the sunset. A warm wind that only summer nights offer; golden light bouncing on every flower. We picked and picked. And ate some too. And as soon as a plump berry touched my lips, it wiped every memory I ever had of tasting a raspberry before.

    When we came home, we whipped cream and folded it into fromage blanc. And a raspberry charlotte was in the fridge before dinner got on the table.

    It’s not perfect by any means, but some things don’t need to be.

    Charlotte au fromage blanc et aux framboises

    This is a slightly more elaborate version of the charlotte that my mother made often as we were growing up. It is not a delicate entremet, but one to be sliced for lunch or dinner, when the nights get longer and warmer. As I’ve mentioned it above, I love to make this while berries are in season, but it also make a wonderful winter dessert. Think poached pears and perhaps a touch of chocolate mousse. Or poached rhubarb and orange in the late winter.

    If fromage blanc isn’t available where you live, just use plain natural yoghurt mixed with a little cream cheese instead, a thick Turkish yoghurt would work wonders too.

    EDIT 06/03/2019

    As you may know, I’ve been trying to write an article about gelatin for – literally – years. And every now and then, I become obsessed with it again.
    I’ve been thinking about it a lot lately, as it’s an ingredient that is so tremendously different from one country to another that it makes my job as a chef and a food writer quite difficult.
    I won’t get into details about it now, but let me just tell you that in between France, the UK, and Sweden, I’ve had to adjust my recipes a lot to fit the gelatin available in each place.

    Yes, gelatin is a difficult subject when it comes to recipe writing as many factors com ein play: brand, bloom strength, weight of each sheet… Sure, you can find information about how gold leaves weigh around 2g, platinum, 1.7g, and so on. And because of this, it should be the same to substitute one leaf of gold for one leaf of platinum. But then again, it depends on the country too. In Sweden, the gelatin used in professional kitchens comes at 4g per sheet, extra gold! And the same brand gelatin, when bought in supermarkets is only half the size, roughly 2g per sheet. So I’ve learnt the hard way that grams are some how more reliable that sheet counts.

    The original recipe called for 6 leaves of gelatin, and the gelatin used was the French Vahiné, which comes at around 1.89g per sheet.
    I’ve now edited the recipe to include weight too, although note that I mostly use silver and gold strength gelatin leaves, so your gelatin has a strength comprised between 160-190 bloom, you might need to increase the quantity slightly!

    Charlotte au fromage blanc et aux framboises

    serves 8

    For the biscuits cuillère
    two dozens of biscuits cuillère, either homemade or bought
    300g water
    210g caster sugar

    For the fromage blanc filling
    6 gelatin leaves, approximately 12g
    500g fromage blanc
    120g caster sugar
    330g whipping cream 35%, whipped to soft peaks

    a couple handfuls of raspberries

    Make a simple soaking syrup by combining the water and caster sugar in a saucepan. Bring to the boil, then pour into a wide container, and allow to cool down while you get on with the rest.

    Soak the gelatin leaves into cold water for at least ten minutes. Divide the fromage blanc into two heatproof bowls.

    In one of the bowls, mix in the sugar until dissolved. Heat the other bowl containing half of the fromage blanc in the microwave until it reaches around 40°C. Then quickly drain the gelatin leaves, and incorporate to the warm fromage blanc. Mix until fully melted. Then, fold this into the sweetened fromage blanc. And finally, gently fold in the whipped cream in a couple of batches.

    When the syrup is cool enough, soak the biscuits into it for a few seconds and arrange in a shallow charlotte mould.

    Pipe half of the mousse into the biscuit-lined tin, then cover with a handful of raspberries and more soaked biscuits. Top with the remaining mousse.

    Chill for a couple of hours, preferably overnight. Unmould and serve.

  • My second week as a stagiaire at Pierre Hermé, into the macaron universe

    My second week as a stagiaire at Pierre Hermé, into the macaron universe

    How does one prepare to work in the macaron team? That was exactly what I asked myself on the RER ride home after my first day with the afternoon team – the macaron makers.

    I was exhausted, but also in awe. How could the team be so fast, precise, and professional, while still managing to be funny and kind?

    I arrived at the Vaugirard shop well in advance, around 1:30pm, wanting to make a good first impression. The routine was now familiar: uniform on, aprons tied, hands washed, greetings exchanged. And then, I stepped into the macaron universe.

    The rhythm of macaron-making

    First, the ganaches. I started with jasmine, a delicate and fragrant batch, but by the time I had finished, the others had already made two, sometimes three.

    Then, sorting the coques – the delicate macaron shells. Any broken ones were set aside, baking papers flipped onto racks, and the coques lined up: 12 across, 8 down. It might sound simple, but after a few hours, I felt like a macaron-sorting machine. My tired brain blurred the sizes together, and I realised how quickly repetitive tasks can play tricks on perception.

    Next came filling and closing. One or two chefs piped the luscious ganache onto the waiting coques, and I followed, closing them as quickly as possible. The ganache sets fast, and if not closed in time, it doesn’t form the perfect little belly. This was my favourite part – until we got to the Ispahan macarons.

    Not only did these need to be closed, but before that, each one had to be topped with a tiny square of homemade raspberry gellant. The sticky fruit jelly, made with agar agar instead of gelatine, added an extra step that required precision and patience. The result, though, was worth it. Biting into a perfectly round, glossy macaron, only to discover a hidden raspberry surprise, was nothing short of magic.

    Pierre Hermé’s signature touch

    This hidden centre is what sets Pierre Hermé’s macarons apart. Each one holds a little unexpected treasure:

    – Olive oil and vanilla – two tiny pieces of green olive.
    – Ispahan – a raspberry gellant square.
    – Mosaic – two griotte halves (this one is my favourite).
    – White truffle and hazelnut – three crushed hazelnuts.

    It’s a brilliant idea, elevating each macaron beyond just a shell and a filling, making every bite a layered experience. And then there’s the ganache itselfgenerous, rich, the true focus of the macaron.

    Closing time (or so I thought)

    By the time we finished the last of the 6000 to 8000 macarons, it was already 11pm, and I assumed it was time to go home. I was wrong. Totally wrong.

    Cleaning time.

    Surprisingly, I didn’t mind. Cleaning the fridge felt almost refreshing after hours of standing in the heat. I hadn’t realised just how warm the room had become until I stepped inside. Who said macaron-making isn’t a sport?

    The days after

    Despite the tiredness, the heat, the repetitive motions, something shifted after that first day.

    I got faster, more precise. I learned the rhythm of the team, the flow of the work. I made ganache after ganache, filled and closed hundreds of macarons, and worked alongside some of the kindest people I’ve ever met.

    By the time my week with the macaron team ended, I almost didn’t want to leave (almost). The whole experience felt like a blur – a week that somehow lasted a minute.

    The reward

    Of course, I had to celebrate all the hard work. And what better way than with a selection of macarons from the current collection?

    The tasting

    01. Arabesque
    Macaron sprinkled with pistachio, filled with apricot ganache and pistachio praline. The ganache, thickened with dried apricots, contains no cream. The pistachio praline? Absolutely out of this world.

    02. Café fort [strong coffee]
    A clean, well-balanced coffee ganache, wrapped in beautiful shades of brown.

    03. Thé au jasmin [jasmine tea]
    A floral, fragrant ganache with a distinct jasmine taste.

    04. Caramel au beurre salé [salted caramel]
    A rich caramel buttercream filling. Decadent. Impossible to resist.

    05. Chocolat amer [bitter chocolate]
    Dark chocolate macaron with a 70% dark chocolate ganache. The first macaron we make each day, as the high cocoa butter content means the ganache sets quickly. Rich, deep, slightly bitter – a classic.

    06. Mogador
    Milk chocolate and passion fruit ganache. At first, I wasn’t sure. Now, it’s one of my favourites. The sharp tang of passion fruit against the smoothness of milk chocolate is irresistible.

    07. Ispahan
    Rose and lychee ganache with raspberry gellant. I’m not the biggest fan of rose and lychee together, but the sharpness of the raspberry gellant makes this macaron sing.

    08. Mosaic
    Pistachio and cinnamon ganache with two griotte halves. Looks beautiful, tastes even better. The cinnamon warms the pistachio, while the griottes add a sharp contrast.

    09. Olive oil et vanille
    An olive oil and vanilla ganache, with two tiny green olives hidden inside. If you think olive oil in dessert is strange, this will change your mind. The slight bitterness of the oil against the sweetness of the vanilla is unexpectedly perfect.

    10. Rose
    Macaron with rose crème au beurre.
    Tasting notes: Yummy in pink. This macaron is really fragrant and delicate.

    Next week: back to the morning team.

    (First written in July 2007, edited February 2025.)

  • My first week as a stagiaire at Pierre Hermé, rue de Vaugirard

    My first week as a stagiaire at Pierre Hermé, rue de Vaugirard

    Paris, one week in.

    Barely settled from New Zealand, and already I’m on a train to Paris – off to start my long-awaited internship at Pierre Hermé.

    The alarm goes off at 4:30. In the dark, I make my way to the shop in the 15th arrondissement, stepping inside as quietly as I can. It’s empty. Where is everyone? A moment later, I find Sébastien, the head of the morning team, who hands me a set of locker keys. Now, at least, I can head downstairs and change.

    The pâtissier outfit – something I once imagined with so much anticipation – turns out to be more practical than elegant. A loose jacket, high-waisted pied-de-poule trousers, a Pierre Hermé baseball cap. The only redeeming piece: my shoes, white sabots, built for long hours on my feet. Some people manage to make it look good. I am not one of them. If I had any doubt, it vanished when one of the guys saw me in my regular clothes and exclaimed, “Oh mais Fanny, vous êtes beaucoup plus belle comme ça, vraiment.”

    With that settled, I stop looking in the mirror and go upstairs to meet the chefs. Apron firsttwo, actually: one cotton, one plastic. Things will get messy.

    I step into the laboratoire, wash my hands, shake hands with everyone. So many new faces, so many names. I pride myself on being good with names, but this is another level. I smile, nod, listen. The use of vous is enough to remind me that no matter how quickly I learn, I am still the new one here.

    Pastry kitchen survival 101

    Rule one: vous, always.
    Rule two: say chaud – not necessarily because what you’re carrying is hot, but because it’s heavy, in motion, and you don’t want to hear dégage instead. After a while, shouting chaud every few minutes becomes second nature. And useful – I can’t imagine anyone wanting to be doused in 118°C sugar syrup.

    By now, it’s just after six, and I am wide awake. Not just awake – sharp. Watching hands move, pastry bags squeeze, trays slide in and out of ovens, buttercream smoothed into perfect ripples. This is the morning team. They’re here to produce cakes, entremets, yeasted pastries – every motion precise, every detail considered.

    First week, first lessons

    My role? To move from one station to another, stepping in where needed, absorbing everything I can. In my first week, I’ve done everything from sorting almonds to making candied lemon peel. I start with something simple – measuring ingredients for crème onctueuse au chocolat. Straightforward, a good way to ease in. Then, the unexpected: the manager tells me to help Simon decorate the Ispahan entremets.

    Ispahan. One of the it-pastries at Pierre Hermé. My excitement rises as I stand before the delicate pink creations, ready to arrange raspberries over rose-scented buttercream, tuck fragrant lychees between them, pipe a tiny drop of glucose onto a rose petal before pressing it gently onto the macaron shell.

    Then, the Emotions. Pierre Hermé’s signature glass dessertslayered, spoonable. I make both Mosaic (griotte jelly, pistachio jelly, mascarpone cream) and Celeste (rhubarb compote, strawberries, passion fruit mousse, passion fruit marshmallows). The passion fruit marshmallows – light as air, with just enough chew. Separating hundreds of them, rolling them in icing sugar, takes patience, but the result is worth it.

    At some point, they let me make an entire batch of Sensation Céleste. A glass layered with jellies, topped with a macaron. First, rhubarb compote – gelatine, purée, lemon, sugar. A measured pour into each glass. Time to set, then another layer, another. I pipe tiny rounds of banana and strawberry jelly for Désiré, a dessert that’s just as delicious as it sounds.

    But I can’t just stay at my station – I find myself watching Anna, who handles everything that goes into the oven. Brioche, croissants, canelés, millefeuilles. The canelés are the best I’ve ever hadsoft inside, deeply caramelised outside. The Mosaic millefeuille is a dream, pistachio cream playing against the tart griottes.

    Next week: c’est la folie des macarons.

    (First written in July 2007, edited February 2025.)