
I thought it would be nice to start my weekend boulangerie posts with a book quote. You know, being the weekend and all. Perhaps, you’ll want to do what I’ve doing and explore forgotten books.
Yes, I’ve had time. To bake, to draw, to read.
And yes, I’m extremely happy.
On this subject, a few nights ago, we watched a documentary – in Swedish – about what used to be Frantzén/Lindeberg. It was unusually accurate and very interesting. I could relate a lot; with both Frantzén and Lindeberg, who were in two – very – different phases which caused them to separate. But really, I especially liked the part where Lindeberg – after leaving the restaurant – says (and I’m about to very badly paraphrase/translate him) that once you leave that intense bubble created by the constant need to reach perfection, you start to soak in the beauty of life that has been around you all these years without you even noticed.
And while I don’t want to leave that bubble behind just yet, it’s certainly refreshing to be able to live without being consumed by a limitless passion that restlessly occupies every of your thoughts.
“It was a pleasant May morning in 1775, and the air was filled with the fragrance of the freshly cut pine logs that had been poled down the river in big rafts to be cut into planks and boards at the big sawmills. The river, unusually full with the spring rains, dashed against its banks as if inviting the little girls to play a game with it. Usually Anna and Rebecca were quite ready to linger at the small coves which crept in so near to the footpath, and sail boats made of pieces of birch-bark, with alder twigs for masts and broad oak leaves for sails. They named these boats Polly and Unity, after the two fine sloops which carried lumber from Machias to Boston and returned with cargoes of provisions for the little settlement.
But this morning the girls hurried along without a thought for such pleasant games. They were both anxious to get to the lumber yard as soon as possible, not only to fill their basket with chips, as their mother had bidden them, but to hear if there were not some news of the Polly, the return of which was anxiously awaited; for provisions were getting scarce in this remote village, and not until the Polly should come sailing into harbor could there be any sugar cakes, or even bread made of wheat flour.”
Alice Turner Curtis (1920), A Little Maid of Old Maine

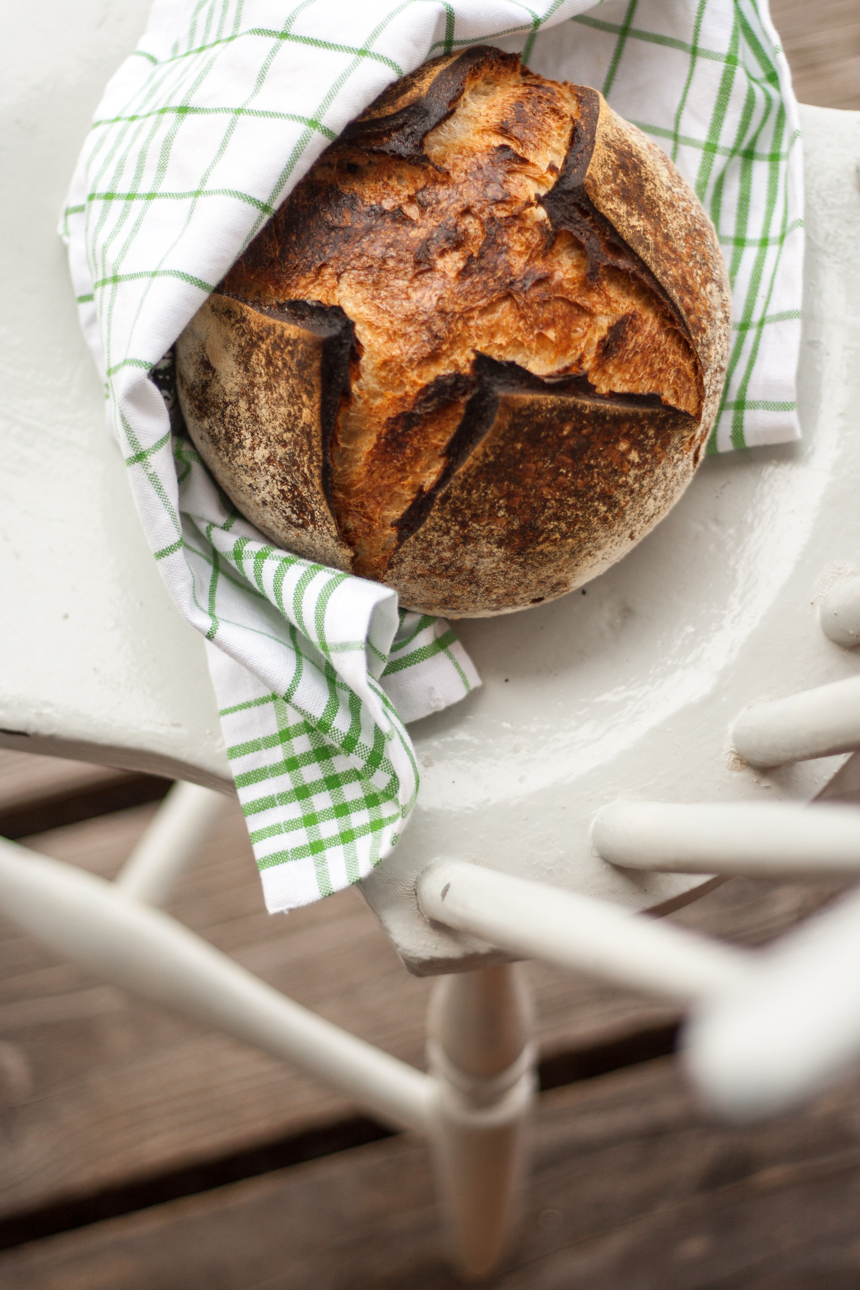
Kusmark sourdough
Adapted from Jeffrey Hamelman’s Bread: A Baker’s Book of Techniques and Recipes.
You know those times when you know you’re doing something wrong, but you decide to go ahead and do it anyway. When, this was me, all over this bread. And yet, it turned out beautifully.
A lovely chewy crumb, with a wonderful sourdough aroma – yet not too strong – and a dark crisp crust.
I had a slice with a little butter and that Swedish flaky salt I’ve fallen in love with; the bread still slightly warm and the butter oozing on my fingers.
The dough felt quite dry and gluten development was very fast. I guess I’ve gotten too used to my usual 75% hydration sourdough and this one being only 65%, it was surprisingly easy to work with.
Yes, I do think it’s one of those magic breads that can absorb mistakes. Perhaps, a new go-to.
I’ve named it Kusmark sourdough as it is apparently custom to name your bread according to the geographical location of your starter. And really, I thought it sounded great.
The recipe.
Makes one boule.
The recipe is based on Jeffrey’s Vermont sourdough, which seems to be loved by many.
| 75 | g | T55 flour | 100% |
| 95 | g | water | 125% |
| 15 | g | starter | 20% |
| for the dough | |||
| 375 | g | bread flour | 90% |
| 50 | g | whole rye flour | 10% |
| 231 | g | water | 65% |
| 169 | g | levain | |
| 9.5 | g | salt | 1.9% |
![]()
The ingredients.
Jeffrey recommends to go for a 12% protein flour for his levain breads. So I went ahead and used my Kungsörnen vetemjöl special and the Saltå Kvarn rågmjöl that I’ve also been using to feed Surdeg these past few weeks.
The latter seems to absorb slightly more water than what rye has gotten me used to, so if you’re using the same flour, you might need to adjust the hydration slightly.
Starter used: Surdeg (19/03/2015), 14 days old.
![]()

The timing.
Mixing the dough & autolyse = 1 hour-ish.
Bulk proofing = 3 hours, with one or two folds.
Pre-shaping, bench rest & shaping = 35 minutes.
Fermentation = at room temperature, for around 2-3 hours or 1 hours at 20°C then retarded overnight (for up to 16 hours according to Jeffrey) at 5°C.
Baking = 45-60 minutes, depending on the size of your loaf.
![]()
The process.
While I’m a bit of a perfectionist when working, I must say that I’m way more laid-back when it comes to home baking. In my mind – perhaps because I’ve spent so much time being insanely precise – I really like the nonchalance of baking at home. Yes, the oven isn’t perfect. Yes, the dough temperature might be too high or low. Yes, you will fail. But I’ve learnt to appreciate all of these. Maybe that will change, but for now, I’m pretty happy to take it for what it is: trying to make the best things possible in a home kitchen environment.
That means, I’m not going to lie, that:
– I didn’t measure dough temperature, even though I know they’re important. I adjusted the water temperature slightly to have a dough slightly warmer than 23°C, which I measured with my hands. There you go probe.
– I don’t have a banneton to prove my loaves, but a bowl lined with a floured kitchen towel.
– I didn’t score my bread using a lame – but a small serrated knife.
Other than that, here is the process I followed.
Make the levain.
In a bowl, mix your active starter and water. Add the flour and mix until smooth. Cover with clingfilm and allow to ferment overnight.
Mix the dough & autolyse.
In a large bowl, combine the levain, water, and flours until it just forms a dough. Leave covered for an hour.
Bulk proofing.
Add the salt and knead the dough to medium gluten development. The dough will feel elastic and smooth but slightly loose.
If you’re feeling like it, Jeffrey tells us the dough should now be 24.4°C.
Cover with clingfilm and leave at room temperature to proof for around three hours.
Folds.
My gluten development being a bit more than medium, I only gave the dough one fold. To give a fold, simply place the dough, “nice side” down on a slightly floured surface (I didn’t need any flour here) and pat with the palm of your hand into a rectangle. Then fold like a business letter. And again in the other direction. Place back into the bowl, and keep on proofing.
From the very beginning till the end of the process, make sure to keep the “nice side” – or seamless – of your loaf as is. While the other side will always be the one with seams.

Shaping.
Place “nice side” down onto a lightly floured surface. Pat down with the palm of your hand to degas the dough. Pre-shape the dough into a rough ball. Then cover it with a cloth – leaving its “nice side” down so not to put any flour on the seams and leave for around 30 minutes. In the meantime, get your banneton – real or homemade – ready. Then shape the dough into a tight ball, on a clean surface; the sticky dough will pull the outer layers creating some surface tension.
Place the dough seam-side up into your banneton if you intend on scoring the bread. Or for a more natural look, place the seam-side down to let the natural cracks bloom in the oven.
Fermentation.
You can either ferment your loaf at room temperature until doubled in size and a positive finger poke test, or proof for around an hour before wrapping it in clingfilm or placing it in a sealed bag, and retard it in your fridge for up to 16 hours.
I went for the latter. But I think my fridge was too cold as barely any fermentation happened overnight and I had to leave my bread to proof outside for another two hours in the morning before it was ready to go in (slightly underproofed, but I had reached my patience limit).
Scoring.
Unmould your loaf onto a piece of baking paper, big enough for you to lift the bread to the cast-iron pot. And score into the pattern of your choice.
Scoring weakens a portion of the outer dough layer, creating the perfect escape for steam during baking and the cuts will expand in the oven, making sure your bread gets to its full volume.

Baking.
Preheat the oven to 250°C for at least an hour before your bread is ready. You can preheat a cast iron pot as well, although I’ve baked bread in a cold pot before with great results. It’s really up to you, although I do think a hot pot will generate a better oven spring.
I choose to bake in a cast-iron at home for two reasons:
– it removes the need for a stone: cast iron will accumulate heat, just like a stone would. A hot cast-iron pot will prevent your bread from sticking and has amazing heat retention properties, which means it’ll keep your oven hotter and provide a real nice hot base for your bread to bake on.
– the bread steams itself: by placing a lid on top of your pot, you allow the steam that comes out from the bread to stay in a closed environment, hence acting as a steamer.
Yes, steam is essential for a good crusty bread that has a lovely oven spring. As the steam moisten the surface of the bread – retarding the gelatinisation of starch, a process which starts at around 60°C – it will increase the volume of your loaf and turn the crust into a shiny surface.
I baked mine at 250°C for 20 minutes with the lid on and then 30 minutes without. A quick way to check if your bread is done is to probe its centre. It should read 96-98°C for a sourdough bread.
![]()
Notes.
Next time, I’ll increase the hydration to 70%, to – perhaps – get a more open crumb.
I also need to check my fridge temperature to make sure it’s not too cold.
Perhaps, I’ll use a lower protein flour, around 10.5-11% proteins.
![]()
Vermont sourdough ressources.
Jeffrey Hamelman’s Bread: A Baker’s Book of Techniques and Recipes
The fresh loaf’s posts on Vermont sourdough.
R.F. Tester & W.R. Morrison (1990), Swelling and gelatinisation of cereal starches.
Leave a Reply