Category: In my kitchen

  • Chewy flapjacks

    Chewy flapjacks

    I started collecting objects, to make up for memories I forgot. A blue pool ball, a broken cigarette, a plastic table number.

    I read words. Most of the time, at night. Yes, all it took was a few words. Perhaps, a bad google translation too. In fact, some words don’t translate well into French. But it was cute. And it made me miss him even though I thought he was part of those long gone memories.

    And when the world we both knew started to fold itself and disappear, I employed magical thinking. Of the good kind. Possibly involving flapjacks. Because, let’s face it, they seem to be a bit of a mystery around here these days.
    Some people want them crunchy. Most go for chewy. A pinch of flour or not? And what about condensed milk…

    Chewy flapjacks

    Those are, by no means, the best flapjacks ever. There are in my own world. But then, I wasn’t lucky enough to be brought up on crumpets and marmalade, and had to make the most of croissants and confiture.

    They are those flapjacks with a thin crunchy crust and soft chewy – almost – fudgy crumb. If you’re after the crunchiest kind, I would suggest to use a larger pan (so the overall thickness is thinner) and bake them at a slightly higher temperature. Perhaps, 190°C.
    Here, I bake them at 180°C. But please, as with all baking, keep in mind that I have a diplodocus of an oven. Non fan-assisted. And with all the heat coming from two gas burners at the bottom. If you have a fan oven, it’s good to reduce the temperature by 20°C (and open a bottle of champagne).

    There are two important steps – if they can even be called this way. The first is to line the pan all the way to the top with baking paper. And the second is not to bring the sugar/butter mixture to the boil before adding the oats. You just want the butter and light brown sugar to be happily melted.

    Chewy flapjacks

    makes 10-12

    200g condensed milk
    150g butter
    85g light brown sugar
    60g golden syrup
    5g maldon sea salt
    320g oats

    Preheat the oven to 180°C/fan 160°C, and line a 20x20cm baking tin with baking paper. I like to butter the pan first so the paper nicely sticks to it, without any crease.

    In a large pan, place the condensed milk, butter, light brown sugar, golden syrup and salt, and cook over slow heat until the butter has dissolved.

    Mix in the oats until nicely coated. Spread into the lined tin, pressing down with the back of a spoon to chase any air. Bake for 18-20 minutes, or until the edges just start to brown.

    Allow to cool, then slice into rectangles – trimming the edges, as you do so – with a sharp knife.

  • Olive oil jelly

    Olive oil jelly

    Olive oil jelly

    It all started one night, when J. mentioned three words. Olive. Oil. Jelly.

    It was last week. Ever since, I haven’t stopped thinking about all the desserts we could make with it.
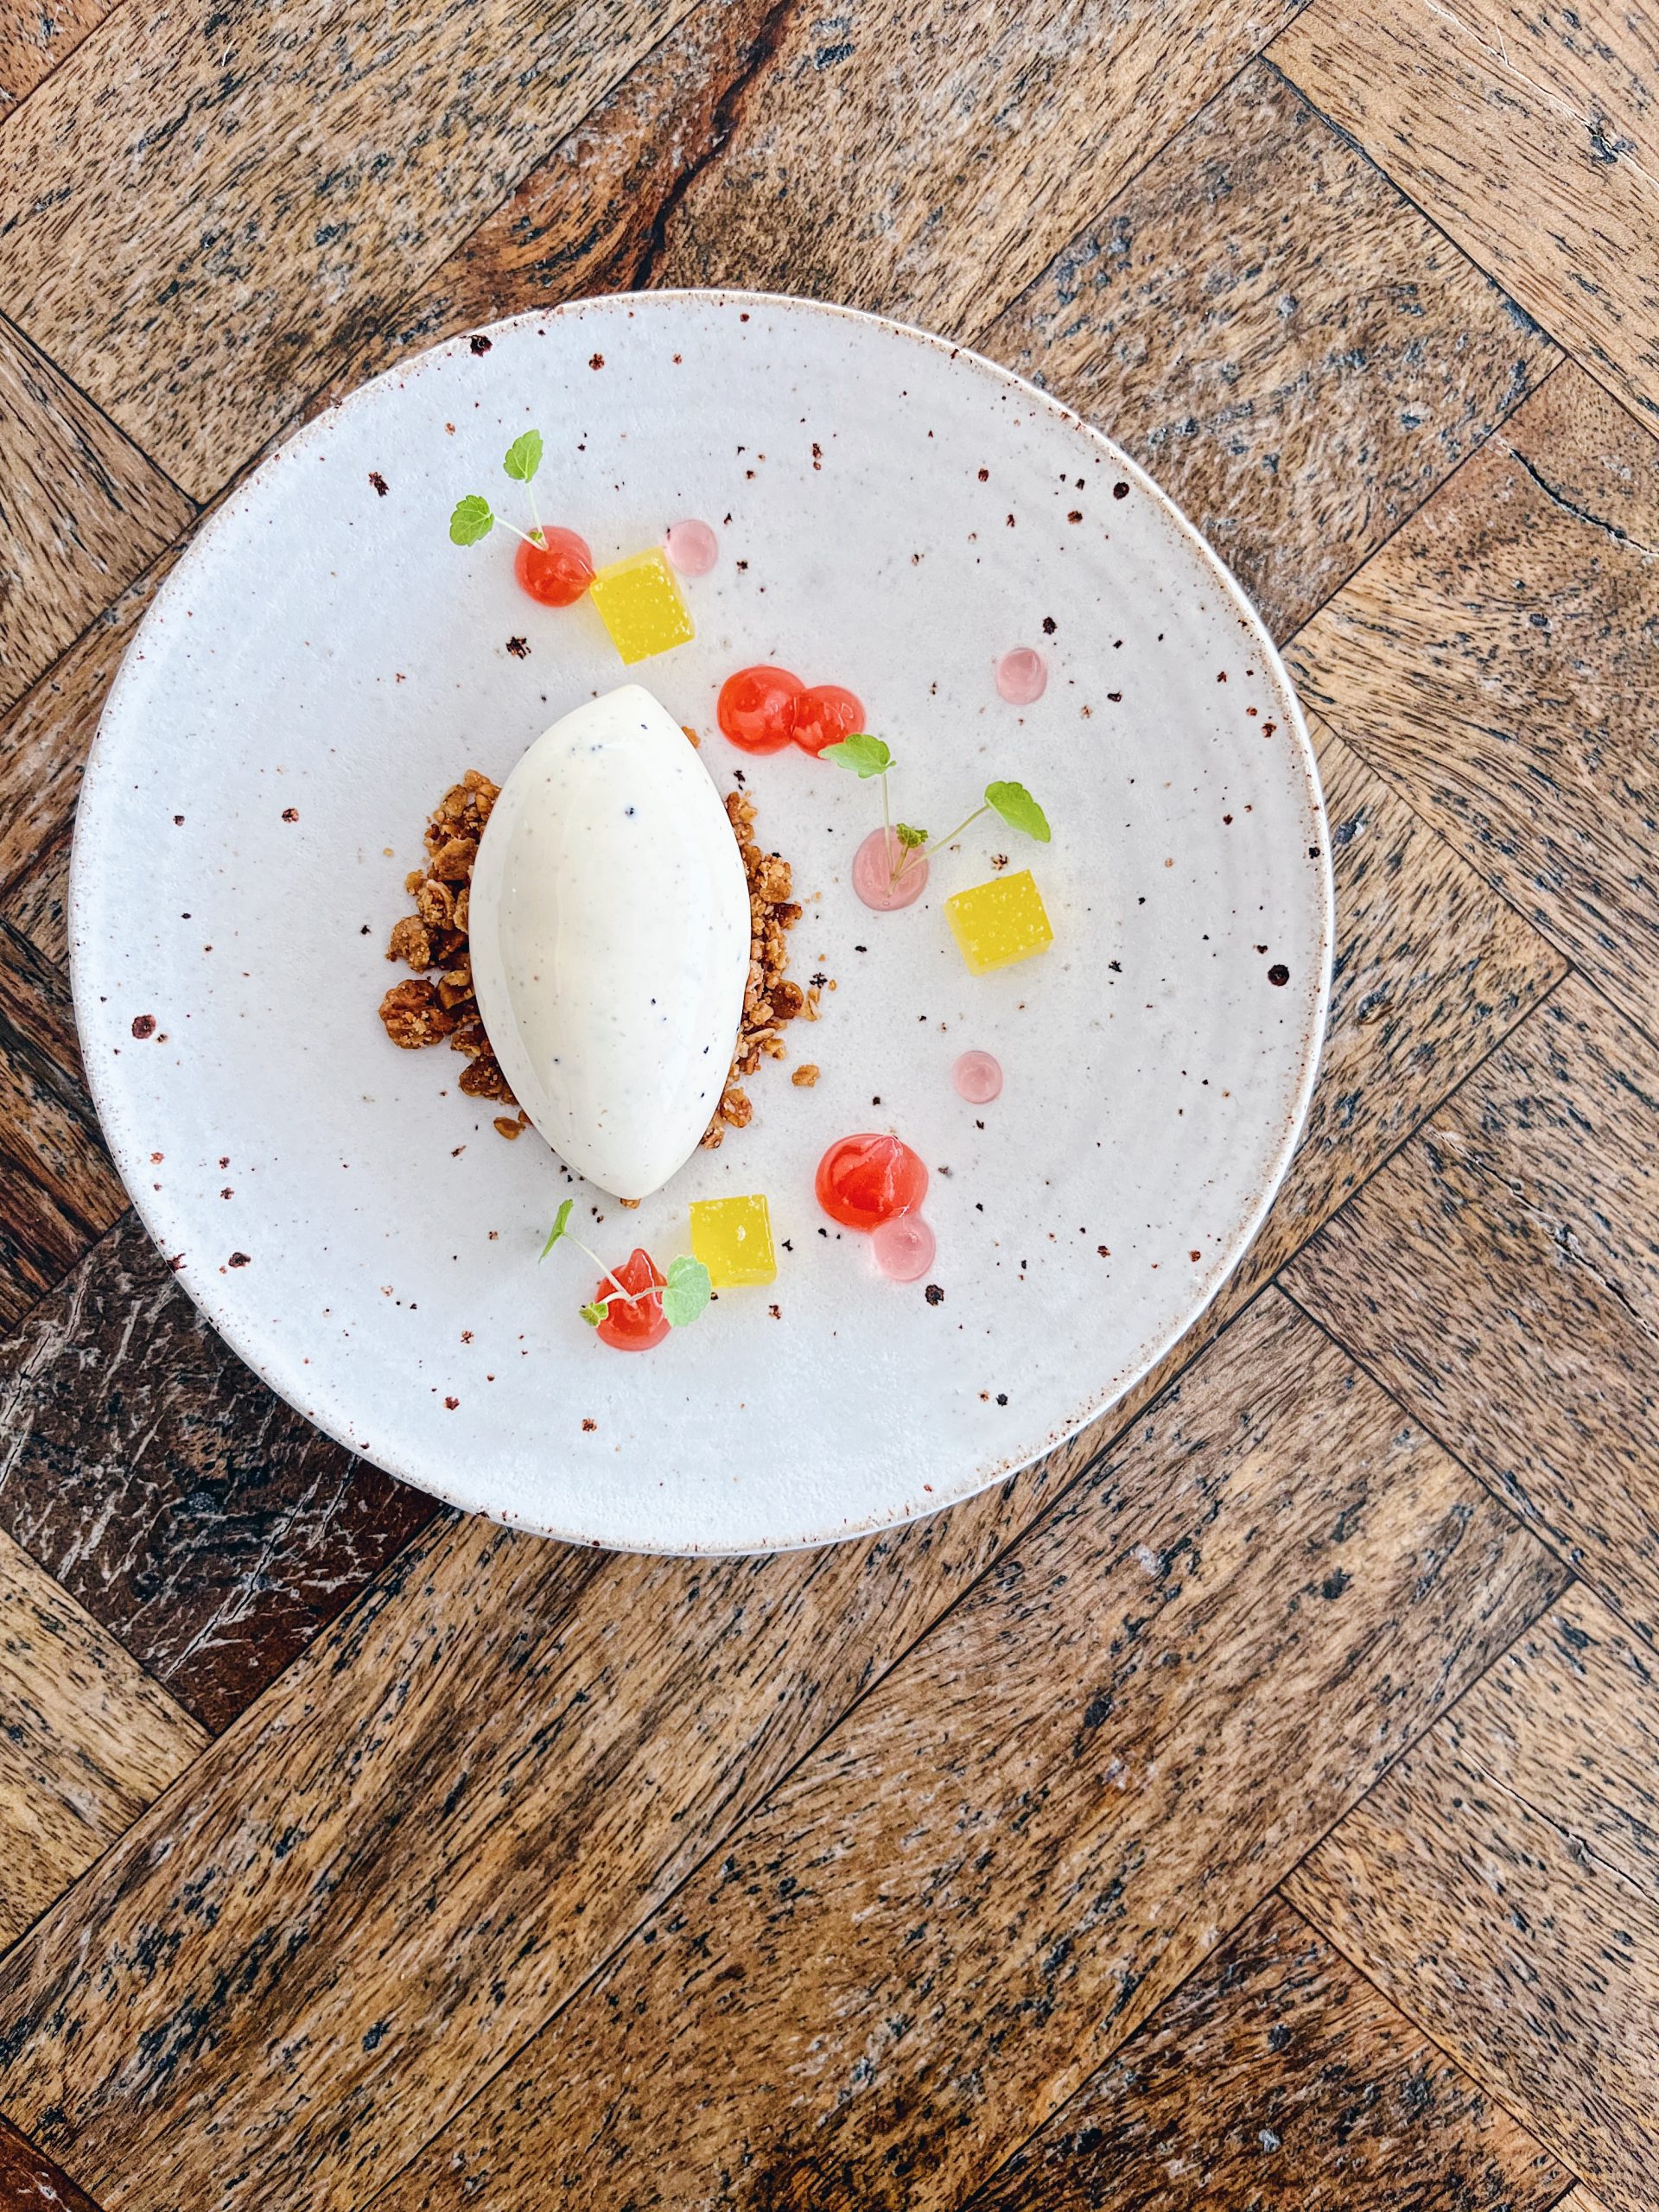
    I mean, my favourite summer snack is vanilla ice-cream with a drizzle of olive oil and a sprinkle of fleur de sel after all.

    So we’ve been working, trying to find out how to turn pungent oil into a clear jelly.

    And somehow, I think we’ve gotten there. After many failed experiments.

    In autumn, with figs, a young brillat-savarin curd, and a warm sponge so full of vanilla seeds it’s almost grey. Perhaps, a few toasted and salted almonds for crunch.

    In winter, with caramelised apples, a white chocolate granita – not unlike snow, crystallised rosemary, and fresh apple bubbles. And maybe, a few baby quenelles of croissant ice-cream. But that’s just a thought.

    In spring, with strawberries and a hibiscus sorbet. Or flapjack ice-cream. Oh yes, flapjack ice-cream sounds good. Maybe with rhubarb and cardamom, Campari fluid gel too!

    In summer, with candied tomatoes. And a simple vanilla ice-cream. Or with an apricot roasted in basil syrup, honeyed kataifi, pistachios, and honey ice-cream.

    Olive oil jelly

    I absolutely adore olive oil in my desserts. A grassy one – almost green – with summer fruits. A sherry-cask aged Arbequina with chocolate and tonka. A matured olive oil with vanilla ice-cream and flaky sea salt.
    Another way to incorporate olive oil in a playful way is this jelly. And although I'm would like to re-work the recipe to make it slightly less sweet, I'm obsessed with it.

    Notes

    This recipe uses isomalt, a sugar that has the property of having a sweetening power of 0.5 – which means it’s half as sweet as caster sugar. 
    It is usually available to buy at specialty shops, but if you can’t get your hands on it, you could substitute it for the sugar of your choice; just keep it mind your jelly might be on the sweeter side. 
    Author: Fanny Zanotti
    Prep Time15 minutes
    Total Time2 hours 15 minutes
    Makes 500 g jelly.

    Ingredients

    • 10 g gelatine
    • 100 g water
    • 120 g isomalt read noter above
    • 90 g caster sugar
    • 30 g glucose syrup
    • 220 g extra virgin olive oil
    • fine sea salt to taste

    Instructions

    • Soak the gelatine leaves into ice-cold water.
    • In a pan, bring the water, isomalt, sugar and glucose syrup to the boil.
    • Take the pan off the heat, squeeze the gelatine leaves and whisk in.
    • Slowly pour the olive oil, emulsifying with a whisk or an immersion blender as you do so. Add salt to taste.
    • Pour into a container or spread onto acetate for a jelly sheet, and refrigerate for a couple of hours.
    • Cut into dices, or use a fork to break it into smaller pieces.

    Note: this post was updated in April 2023.

  • Le fondant au chocolat

    Le fondant au chocolat

    [The ultimate chocolate fondant]

    In London, we’ve had winter in July. Air damp with rain. Kitchens warm with soup on the stove. Oven smelling like chocolate cake.

    And now, in the south of France, we’re having summer in September. Walks through the markets. Sirops d’orgeat at the terrace of the village café. Afternoons at the beach. Ice-cream, in a cone, please. Flip-flops at the feet. Deep-fried is a must, especially when it involves fleurs de courgettes. Watermelon; full-stop.

    It seems that whenever I come down here it’s summer. A summer of the out-of-season kind.

    It also seems that whenever I’m down here, I always return to the same cake. A cake of the homecoming kind.

    It certainly is my go-to. Because, let’s be honest, we all need one.

    One we make on Mondays. One we slice when still warm and slightly runny for a late afternoon indulgence. One we have for breakfast – the day after – cold from the fridge and dipped into the latte we overlooked as we were flipping through the pages of the newspaper. One we finish on Wednesdays after a dinner made of crusty baguette with a side of sliced tomatoes in their juices; perhaps with a scoop of yoghurt ice-cream.

    This cake is dark and dense. The very definition of a fondant.

    And since we’re at it, I shall let you know that what we – French – call fondant is somehow different to the fondants I’ve been known to bake à la minute for the restaurant.
    In fact, if you’re thinking about small little cakes with a melted chocolate centre, we call them coulants in good old France.

    So please, mind your French, will you 😉

    Fondant au chocolat

    Fondant au chocolat
    Adapted from Pascal Lac.

    I’ve told you about this cake before. It is, as I’ve mentioned above, a keeper. If you’re after a moist chocolate cake, then this is the one.

    Plus, it’s damn easy to make. Just chocolate, butter, eggs, sugar, and flour.
    Oh yes, ok, eight eggs and four hundred grams of sugar. Just forget about this and bake it in a 28cm pan for thinner wedges.

    It is worth it!

    When it comes to the chocolate, I like to use a slightly bitter, most possibly 70%. And I have to admit Valrhona Guanaja is especially great for cakes of all kinds.

    The only tricky – and when I say tricky, I mean very merely – step is to bring the eggs and sugar mixture to room temperature-ish over the heat.
    You can either do it straight over the gas, making sure to mix at all time while turning the bowl to ensure heat distribution. Or do it over a water-bath (which should not stop you from mixing and turning the bowl!).

    This step is done, as we say in French, to casser le froid [break the coldness]. And it will incorporate a little air in the eggs.

    Fondant au chocolat

    Makes one 24 to 28cm cake.

    200g dark chocolate
    240g butter
    8 eggs

    400g sugar
    130g flour

    Preheat the oven to 170°C, and generously butter a 24 to 28 cm springform pan.

    In a bowl, melt the chocolate and butter.

    In a heatproof bowl, mix the eggs and sugar – using a whisk – and place over medium heat (or as said above, on a water bath). Keep on mixing until not cold anymore. It shouldn’t be hot either.
    Pour the chocolate over the egg mixture, and mix to homogenise. Sprinkle the flour over and using a rubber spatula, gently incorporate it until just smooth.

    Pour the batter into the prepared tin and bake for 30 to 40 minutes (if you’re using a smaller tin) until just set.

  • Une maryse

    Une maryse

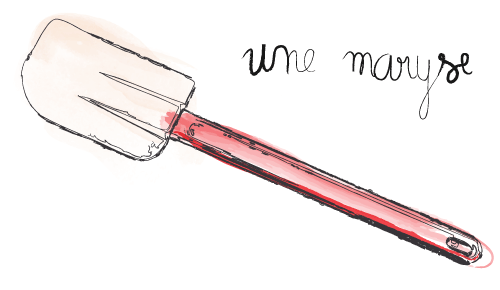
    A maryse, pronounced MAH-REESE, is – what chefs call – a rubber spatula. It is actually a brand, possibly registered by De Buyer, and somehow along the way we started using the name as a utensil.

    There are two kinds. The red ones, which are heat-resistant. In fact, they can take heat up to 260°C. While the white ones – slightly softer and more flexible – are just made for scraping and folding cold preparations.

    I love them for:
    cooking crème anglaise and ice-creams
    folding cream or egg whites into a mousse base*
    scraping a bowl, a pan, or a plastic container

    * That is when I’m not making 20L of mousse, in which case I will go with the hand-and-scraper way.

  • Mastering crème pâtissière, step by step

    Mastering crème pâtissière, step by step

    It was a day at the end of September. A couple of years ago. I put on my pied-de-poule trousers for the first time since the internship I had done the summer before at Pierre Hermé.

    I walked up the stairs, to the biggest, most beautiful kitchen I had ever seen, with the aim to make my biggest, most beautiful dream come true.

    A dream that apparently involved cooking 12L of crème pâtissière. And when I say 12L, I really mean 12L of milk. So if you had up the other ingredients, it makes around 16kg of silky smooth vanilla goodness.

    As a matter of fact, by seven am, the hair, that took me an hour to tame at three in the morning, was wild again. And my cheeks were the colour of bike rides in the wind.

    I don’t want anyone to get hurt by making crème pâtissière, so I’ll just give you the half-a-litre recipe. Which happens to be just enough to fill a tart or a handful of choux, plus a couple of tablespoons for personal consumption.

    This recipe is a basic crème pâtissière. A very simple cream made of milk, vanilla, egg yolks, cornflour, and caster sugar.

    As usual, I can only advise you have all of the ingredients ready and measured before you start. Along with the equipment.

    500g milk
    one vanilla pod
    3 egg yolks
    60g caster sugar
    40g cornflour

    one medium saucepan
    two small whisks
    a fine chinois or sieve
    two maryses
    a small bowl
    a shallow plastic container

    01.

    Place the milk and split vanilla pod into a medium saucepan and bring to the boil, whisking every now and then.

    02.

    In a small bowl, mix the egg yolks and sugar with a whisk, until fully combined. This prevents the caster sugar from reacting with the thin skin of the yolks, which would create some small lumps.
    Add the cornflour and incorporate.

    03.

    Temper the egg yolk mixture with the strained milk (to get rid of the vanilla pod). Whisking as you do so.

    04.

    Pour back into the pan – off the heat – whisking continuously. Then over soft heat, bring to the boil, whisking at all time.

    05.

    As soon as the mixture reaches the boiling point and starts to thicken, keep on cooking and whisking for a minute or two.

    06.

    Pour and scrape into a plastic container.
    And clingfilm to the touch to avoid the formation of a skin. Chill for an hour.

  • Cornbread, comme à Caravan

    Cornbread, comme à Caravan

    [Cornbread, just like at Caravan]

    Sometimes, all I want is to put my warmest boots on, and escape to a place outside of time. I would drive there for hours. To the sound of wind and the smell of rain through the open windows.

    I would wake up too early in the morning. And have a coffee; or two. With a side of freshly-churned butter and a piece of toast. It would be cold. And foggy. Perhaps so much I wouldn’t be able to see the coast.

    I would spend my days at a small bakery. Or on a farm. And at night, I would leave the curtains open to watch the stars.

    Cake au maïs, comme à Caravan
    Adapted from Miles Kirby.

    As soon as I came home from brunch Caravan, I knew that the cornbread we’d just had was bound to happen again in my kitchen. And after a quick search, I was lucky enough to find the recipe. And a simple one too.

    In less than 10 minutes, you can have a cornbread in the oven. Which makes it even more perfect for breakfast or brunch.

    At Caravan, it was served with a chipotle butter, but I went for the easy way and just served it with a knob of butter topped with freshly-sliced red chili.
    Make sure you have a wedge of lime ready!

    Cornbread, comme à Caravan

    Makes one loaf cake.

    400g milk
    3 eggs
    60g butter
    , melted
    250g corn kernels (from approx. 2 corn cobs)
    a bunch of spring onions, finely sliced
    170g polenta
    60g bread flour
    1 tbsp baking powder
    1 tbsp caster sugar
    1 tbsp flaky sea salt

    butter, chili peppers, limes, coriander; extra, to serve

    Preheat the oven to 180˚C and generously butter a loaf tin.
    In a bowl, mix the mix the milk, eggs, and melted butter. In another bowl, combine the polenta, flour, salt, baking powder, and sugar. Add the wet ingredients and mix until smooth. Add the corn kernels and the sliced spring onions.

    Transfer to the prepared loaf tin and bake for 20 to 30 minutes. Or until golden brown and the tip of a knife inserted in the centre comes out clean.
    Unmould and allow to cool for a few minutes before slicing into fat slices, using a serrated knife.

    Serve – toasted opr not – with butter and sliced chili. With a side of limes and perhaps a few sprigs of coriander.

  • PS. Une brioche avec un peu plus de beurre

    PS. Une brioche avec un peu plus de beurre

    [PS. A brioche with a tad more butter]

    London, sometime in April.
    I made a brioche. In five minutes; and five days. We woke up early to shape and proof the dough. Well, I did. A couple of hours later, we sat at the table, with our eyes still plein de sommeil [full of sleep].

    And we had a slice each. With plenty of strawberry jam. And a cup of coffee.

    I then proceeded to braid my hair. And for a walk we went. The trees were snowing and no matter how long I will live in London, my dreams will always float higher with the April snow.
    Another coffee was taken, at a café this time; perhaps in Fulham or Clapham. I can’t remember.

    But I recall a phone conversation with my mum. About the brioche. And how she should make it.

    France, sometime in May.
    I flew in wearing UGG boots and a wool scarf. But as we reached the car on the airport parking lot, I switched for those leather sandals I’m so fond of.

    We arrived home. And dropped the suitcases somewhere in the living room.

    Without judging unpacking necessary, we headed to the kitchen. An apron got wrapped around my waist, flour got weighed out, dough was put away in a bowl.

    And before we knew it, we made a brioche. In five minutes; and a five days. Oh and five hundred grams of butter. Perhaps with a couple of hidden chocolate squares. Yes, perhaps…
    It tasted just as good. If not better.


    And just so my mum doesn’t have an excuse not to make brioche, here is the recipe in French. Oui!
    Accents included and all. Mum if you knew how long it takes to add accents when you have an English keyboard, you’d already be making brioche as you read this.

    Dans un bol, fouetter le beurre fondu, l’eau, le sel, les oeufs et le miel. Ajouter la farine et la levure. Mélanger à la cuillère en bois jusqu’à obtention d’une pâte souple et homogène.

    Recouvrir le bol avec un torchon et laisser pousser à température ambiante pour un peu plus de 2h.

    Une fois la pâte ayant doublé de volume, mettre le bol – toujours recouvert d’un torchon – au frigo pendant au moins 24h.

    Le lendemain – ou n’importe quand dans les cinq jours qui suivent – beurrer un moule à cake génereusement. Prélever 450g de pâte du pâton. Puis la diviser en quatre. Fleurer (fariner) le plan de travail et bouler (former des boules) chacun des morceaux.

    Placer les boules dans le moule préalablement beurré et faire pousser pendant 1h30.

    Pendant ce temps, préchauffer le four a 190°C. Battre un oeuf pour la dorure. Dorer la brioche au pinceau. Et cuire pour 40 à 50 minutes. Démouler et laisser refroidir sur une grille.

  • Scallion pancakes

    Scallion pancakes

    There is something about the way flour bonds with water. Something that possibly goes back to afternoons spent sat on the kitchen counter, watching my grand-mother making pâte brisée [shortcrust pastry], which I would – of course – nibble on.

    So the prospect of mixing flour and water to a dough, then sprinkled with a generous handful of chopped spring onions – and a pinch of Maldon sea salt – felt like music to me.

    I followed this recipe. For those of you who prefer to use kitchen scales – and may the gods of pastry bless you for that – I’ve written the quantities I’ve used below.


    The resulting pancakes are chewy and yet flaky. And the drawing above should have given you a hint, but they’re rather delicious when served with a drizzle – or more – of Sriracha sauce.

    Chinese scallion pancakes

    Makes eight pancakes, or four huge ones.

    Mix 300 g of plain flour with 240 g of boiling water using a wooden spoon. After it comes together, invert onto your kitchen counter and and knead until smooth. five minutes or so. Brush with a little vegetable oil, cover with clingfilm and allow to rest for half-an-hour, or overnight in the fridge.

    Cut the dough into four. Lightly oil your work surface and roll out one of the balls of dough into a thin rectangle at least 30x35cm.

    Lightly brush the top of the dough with vegetable or sesame oil. Finely chop a bunch of spring onions and sprinkle on top of the dough along with a pinch of Maldon sea salt.

    Starting from the long end, roll the dough up tightly, then cut in two. Coil each part into a bundle. Let the snails rest under clingfilm while you repeat this process with the rest of the dough.

    And finally roll out the snails into flat disks.

    Heat a tablespoon of vegetable oil into a frying pan and cook the pancake for approximately two minutes on each side, until golden brown.

    Cut into wedges and serve with a dipping sauce. And when I say dipping sauce, I really mean Sriracha.


    Now, what’s your favourite use for Sriracha? And have you tried making your own?

  • Chouquettes

    Chouquettes

    [Sugar choux puffs]

    I could tell you how my dad would take me to the boulangerie after school, as I was smaller than the smallest tree of your garden. In fact, I could barely walk. But making my way to the bottom of the crumpled paper bag handed to me by the lady at the counter seemed easy.

    That paper bag could hold a dozen of chouquettes. Or as I would call them, chouchou. Possibly, a made-up word from my dad.

    Oh yes, I could tell you how my hands would be sticky. And my mouth most likely surrounded by pearls of sugar.

    But instead, I will tell you about what happened a few days ago.

    I brought milk and butter to a rolling boil. With a pinch of salt, just so; because, that’s the way to go. I added a good amount of flour. Off the heat, it goes without saying (and yet, here I am). I placed the pan back over the gas and mixed it with a wooden spoon until it was just dry enough.
    I transferred it to the bowl of my stand-mixer; although arms and a spoon would do a fine job too. And add the eggs, one at a time. Until it was just wet enough.
    I piped. Without a nozzle, because they all seem to be in London. And I am not.
    I brushed eggwash. I scored the top with a fork. Dipped in the remaining egg.
    I sprinkled sucre casson [pearl sugar].
    I baked. And poured us a glass of white wine. Or perhaps it was a rosé.

    And then, we ate them. Slightly warm. And guess what? Sticky hands and sugar around the mouth are a must.

    Just like they used to be. Just like they always will.
    Which reminded me about this sentence from one of my very favourite books: la contemplation de l’éternité dans le mouvement même de la vie [the contemplation of eternity within the very movement of life].

    Chouquettes
    I think there are roughly as many pâte à choux recipes as there are pastry chefs. I remember a place where a mixture of milk and water was used. Sometimes, they would add a pinch of baking powder. Or some sugar.

    My recipe possibly originated from the one we used at school. Except, it called for water only. And perhaps, a touch more flour and less butter.
As I went by, I switched the water for milk. Full-fat, please. Added an extra knob of butter. A pinch of salt. And reduced the flour to 150g.

    As for the baking method, it’s the one Pascal Lac taught me. A foolproof method that worked even in the most sophisticated English ovens. Or failing that, the most plastic toy-ovens at home.

    Basically, you preheat the oven to 250˚C. Quickly get the trays inside. And just as the oven records 250˚C again (the temperature will drop slightly as you open the door), turn the oven off. For 15 to 18 minutes, until the temperature reaches 160-180˚C; at which point, the choux should be puffed up and yet still pale in colour. Then, oven set on 170˚C, without fan, dry them for 10 to 15 minutes, until nice and golden; and making sure you keep the door slightly open with a wooden spoon to let any steam escape.
    However, feel free to bake them all the way at 200˚C if that works better for you. But I’m warning you: an oven has never failed me with this technique.

    Just a note on the eggs. I usually use around 4 eggs and a half. So what I do is to incorporate the first four eggs, then whisk the last one, add a little of this to the dough and keep the rest for a made-up eggwash!

    Chouquettes

    makes 40 small choux (roughly the size of a golf ball*)

    250g milk
    100g butter
    a pinch of salt

    150g plain flour

    4 to 5 eggs, see note above
    q.s. pearl sugar

    Preheat the oven to 250˚C, and lightly butter two baking trays.

    Place the milk, butter, and salt in a saucepan. Bring to a rolling boil over low heat – you want the butter to be fully melted before the milk boils. Take the pan off the heat and add the flour all at once, mixing as you go until combined.
    Return to the heat. And using a wooden spoon, mix until a thin crust appears at the bottom of the pan. This shows that the dough is dry enough. It should not be sticky.

    Transfer to the bowl of a stand-mixer and allow to cool for 2 to 3 minutes. Then using the paddle attachment, add the eggs one at a time on medium speed until fully incorporated.
    Scrape into a piping bag, fitted with a 12mm nozzle. And pipe little balls, around 3cm wide and 2cm high.

    Brush with eggwash, making sure to smooth the tops. Then, dip a fork into the eggwash and score the top of the choux.

    Sprinkle with pearl sugar.

    Place the trays in the oven. As fast as you can. Really. Trust me, oven temperatures drop so damn fast. Then keep an eye on your thermometer and the second it says 250˚C again, turn the oven off.
    After 15 to 18 minutes (see note above), turn the oven back on to 170˚C, without a fan. After a few minutes, keep the oven door slightly open by sliding the handle of a wooden spoon inside.

    The choux are ready when golden-brown and not too moist inside**.

    * Disclaimer: I have never played golf in my life. Even though I must admit, I really wanted too as a child. So much in fact, it’s now affecting me as I’m using a golf ball as a unit!

    ** Even now, I always test them (and by test, I really mean eat one) every two minutes past 10 minutes at 170˚C.

  • Five-minute brioche

    Five-minute brioche


    When I mentioned the five-minute brioche, I forgot to say it’s more of a five-minute and five-day brioche.

    Five days where the blossoms turned into snow. Five days where I got less sleep than what a normal night means to you. Five days where everytime I came home, I opened the fridge to imagine that bubbly dough turn into brioche.

    And then on the night before the fifth day, I set my alarm to eight am; two hours later than a day on. Still dizzy from a sleep overdose, I walked to the kitchen. Fleurer le marbre [sprinkle the marble with flour]. Couper la pate [cut the dough]. Bouler [make balls]. Faire pointer [proof]. Et se recoucher [and go back to bed].

    This, my friends, is the recipe for happiness. Especially, if I then braid my hair and spend the day with someone I love.

    A couple of hours later, we slowly emerged from that broken night – or more accurately, morning nap; a concept that I should put to practice more often.

    The loaf went in the oven. And then got sliced, topped with the strawberry jam he made last week – with the somewhat bland berries I was a little too excited with at the market – and then eaten in bed, with the necessary dose of good tunes and the occasional sun peaking through the window.

    It felt like a Sunday. With all the trimmings, bar the messy kitchen. And, no matter how much I love to get my hands dirty by kneading the hell out of a sticky dough until it becomes smooth, it seemed appropriate to take a shortcut this time.

    Even more so that this brioche proved the die-hard French that I am wrong.

    First came Dan. And his focaccia. Almost no-knead. And almost more delicious than any bread I’ve ever tasted. Then came the no-knead bread that got everyone crazy. And now, Zoë.

    So as much as it hurts me to say it, it is possible to make brioche in a matter of seconds. In one bowl. With one wooden spoon.

    Brioche en cinq minutes
    Adapted from Zoë François and Jeff Hertzberg’s Five minute bread.

    I once read somewhere that in order to make a good brioche you need time. I think it was actually mentioned as part of the ingredient list, which I thought was clever as I remembered the hours spent kneading – by hand – a three-kg batch at school.

    And while I love the process, I must admit it does feel good to – every now and then – take the easy option. It says five minutes. But it really is less than that.
    Butter gets melted. And mixed with water, eggs, honey, and salt. No sugar. Just honey, which being inverted sugar – kind of natural trimoline – helps the brioche to stay moist after baking.
    Flour and yeast get incorporated. And the dough is left outside to proof. Only to be, later, chilled; for a day or two. Or in my case, five.

    As a side-note, I do think this recipe could take more butter. Possibly twice more. Possibly because I’m French. Possibly something I will try and report. Which will also allow me to show you how to bouler une pâte [shape the dough into a ball], because – let’s be honest – I’m not sure it translate into words.

    EDIT 24/07/2011: We made this again, but with 500g of butter instead of the 350g written below. It worked and was, as expected, delicious!

    Five-minute brioche

    makes four loaves

    350g-500g (read EDIT above) butter, melted and cooled down
    350g water
    20g salt
    8 eggs
    170g clear honey
    1kg strong flour
    15g instant yeast

    one egg, beaten, for the eggwash

    In a bowl, combine the melted butter, water, salt, eggs, and honey. Add the flour and yeast. And mix using a wooden spoon until smooth.

    Cover the bowl with a cloth and allow to rest at room temperature for a little over 2h (or feel bad-ass and stick it in a turned-off microwave – make sure you read the note above beforehand though).

    Transfer the cloth-covered bowl to the fridge and chilled for at least 24h or up to five days.

    On the day you’re ready to bake, generously butter a loaf tin and cut 450g off your dough. Then using a scraper – or a knife – divide into four bits. Have some flour handy and gently pat each piece into it. Putting the flour side up – and sticky side down – shape it into a ball using the palm of one of your hands.

    Place the four balls into the prepared tin and allow to proof for 1h30.

    Preheat the oven to 190°C. Brush the top of the dough with the eggwash and bake for 40 to 50min, or until golden brown. Unmould and allow to cool on a wire rack, or not.

  • Spinach and cheddar muffins

    Spinach and cheddar muffins

    There are things you can never ignore.
    At times, you wish you’d forgotten; crab hunting, kissing in the wind, eating peanut butter and jelly sandwiches, drinking beer by the bottle, killing flies, licking icy popsicles.

    Other times, you’re simply happy to remember; stepping into Pierre Hermé’s kitchen, signing my apprenticeship contract, taking a plane to a new life, biting into a perfectly chewy spinach and cheddar muffin.

    It was a Saturday or Sunday – the day does not matter – of an early autumn morning.
    I had just arrived to London.
    The air was crisp and the sky just turning blue after a night made of blankets and raindrops hitting the windows.

    Somehow, those pretty rustic muffins felt fitting. Right that second, I could smell vanilla frosting and feel the warmth from a just-opened oven door. And by all means, I could hear words from happy people.
    I remember how the first bite burnt my tongue. I remember the heat of pepper, the flavour of onion, spinach, cheddar and perhaps even Portobello mushrooms. And the crumb.

    And then, in between creating desserts and reading books, I forgot about this moment. You know, that everyday-kind of happiness. But as autumn sneaked on us – in a rather unexpected manner – the frosty mornings and dark evenings made our house feel like home.

    A home with soft lights, throws on the sofa, a whistling kettle, and muffins in the oven.

    Spinach and cheddar muffins
    Adapted from the Hummingbird Bakery.

    I could express my love for these muffins through an extended description of their qualities. The bold flavours, the perfect chewy crumb.
    But the fact that they are equally delicious for breakfast, lunch or dinner – preferably with a side of piping hot soup, makes them my favourite in the world.

    Spinach and cheddar muffins

    makes 12

    30g butter
    one small onion, finely sliced
    one fat clove of garlic
    one chili pepper, finely chopped
    350g plain flour
    2 1/2 tsp baking powder
    a good grind of black pepper
    200g cheddar, grated
    250g milk
    one egg
    130g spinach

    Preheat the oven to 170°C. In a pan, melt the butter over medium heat and cook the sliced onion until soft. At the end, grate the garlic and throw the chili into the pan and give a good stir to combine the flavours.
    In a bowl stir the flour, baking powder, pepper and cheddar. In another bowl, whisk the milk and egg together, then pour onto the flour mixture using a wooden spoon to fold.
    The batter will be quite thick, and I must admit I like to use my hands to incorporate the cooled onions and spinach.
    Divide into twelve muffin-cases and bake for 35 minutes. Remove the muffins from the tin and allow to cool on a rack.

  • Brownies fondants au cacao

    Brownies fondants au cacao

    [Cocoa fudge-brownies]

    Brownies fondants au cacao
    Adapted from Alice Medrich’s Bittersweet (thank you Deb).

    When I had my first bite of those insanely fudge-brownies, I felt sorry I hadn’t made them back when I first spotted them on Smitten Kitchen.
    At the time, I thought it would be nice to experiment but wasn’t sure the flavour would be au rendez-vous. But I was wrong. Not only the use of cocoa powder provides the brownies with an intense chocolate taste, but it also is the secret to their amazing texture (along with the high quantity of sugar that is).
    A new favourite at home!

    Edit 29.04.2020

    Over the past few weeks, I’ve received many requests to republish this recipe which I originally wrote about ten years ago. Ten years! I guess everyone could do with a slice of warm fudgy brownies at the moment.

    I haven’t made these in years! Instead, I’ve been baking kladdkaka , a Swedish cake, which is very similar both in terms of formula and texture; so much so that it may not count as different after all. It has become one of my go-tos, and I especially like to serve it with a vanilla anglaise and blueberry compote, which I can only urge you to try with these brownies!
    Or ice-cream that is, one can never go wrong à la mode!

    Brownies fondants au cacao

    Makes 16 squares.

    140 g butter
    280 g caster sugar
    80 g cocoa powder
    1/4 heaped tsp Maldon sea salt
    2 large eggs
    65 g plain flour

    Preheat the oven to 180°C/fan 160°C. Line a 25x25cm baking tin with baking paper.
    Combine the butter, sugar, cocoa, and salt in a bowl and cook over a simmering bain-marie, stirring from time to time until it forms a smooth mixture and feel hot to the touch (around 50-60°C).
    Set aside to cool down slightly, then mix in the eggs one at a time, using a whisk and stirring for a good minute after each one.
    Fold in the flour and spread the batter evenly into the prepared tin.

    Bake for 20 minutes, or until barely set. Allow to cool on a rack, then remove the brownies from the tin and slice into squares.