
There was that weekend, many-many months ago. I had told you about the days when blogs were not so editorially perfect and how I miss them; about the two crumpets with raspberry jam that I had had for an early afternoon breakfast; and about how we’d moved the kitchen table by the window and took way too many pictures.
Because, you see, my book was coming out the day after. And I guess that – as pretty much the entire universe – when I’m about to step in the unknown I like to delve a bit deeper in my comfort zone.
It might be just a breath. Or as it happened, it might be croissants.
There is this one thing I know for sure though. It’s that there are many rainy weekends ahead of us. And really, I thought I’d take you with me.
A time machine of some sorts.
Making the détrempe under the grey light of a drenched morning.
Rolling turns later that day during the blue hour.
And waking up to gold through our windows to finish shaping the croissants.
By twelve, we had hot coffee – much hotter than I’d usually care for, and freshly baked croissants. And perhaps, you’ll have some too.
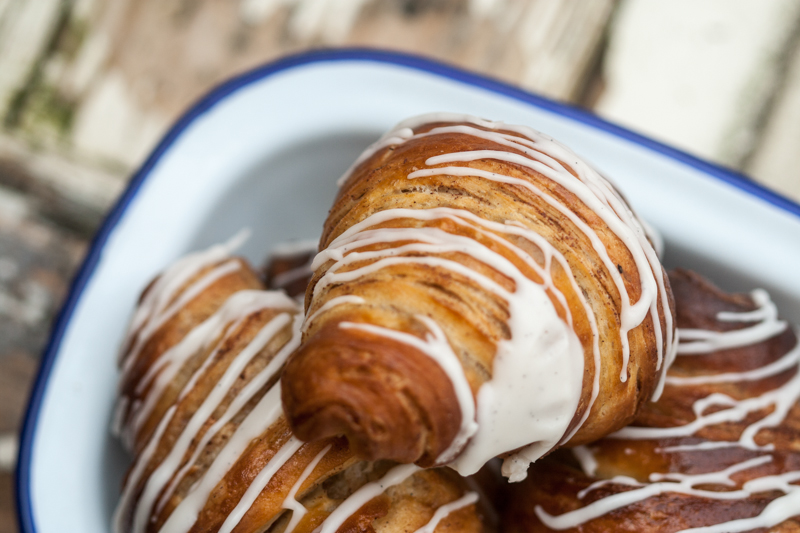
This recipe doesn’t make traditional croissants. But more of a beautiful cross between a kanelbulle and a croissant. Soft and slightly flaky, as I only gave the dough two simple turns, as opposed to my usual croissant routine: three simple turns. In fact, a look at the insides will give it away: the membranes are thicker, and cinnamon speckles dot them throughout.

Perhaps, if you want to, I could make some regular flaky croissants, just like the ones I grew up on, and show you too. Yes, croissants are nothing new. But I guess, in the constant chaos that surround us all, there is still some wisdom left.
The ingredients.
For the détrempe
300 g strong flour
200 g plain flour
80 g caster sugar
12 g instant yeast
10 g milk powder
10 g sea salt
250 g cold water
45 g butter, melted and cooled down
For the butter
300 g unsalted butter, at room temperature
2 tbsp ground cinnamon
For the glaze
200 g icing sugar
boiling water
seeds from one vanilla pod

twelve pm.
Mix the flours, sugar, yeast, milk powder and salt in a large bowl. Add the cold water and butter; and mix until a dough starts to form.

ten minutes past twelve pm.
Transfer the dough to a clean work surface and knead for around ten minutes or until the dough feels elastic and smooth.

twenty minutes past twelve pm.
Place the dough back in the bowl and clingfilm tightly. Leave in a warmish place for an hour or so, or until doubled in size.

twenty-five minutes past twelve.
While the yeast is working in magic, work yours with the butter. In a bowl, mix the soft butter (you could flash it in the microwave for ten seconds at a time until soft but not melted) with the ground cinnamon. Perhaps a pinch of cardamom too.

half past twelve.
Scrape the butter onto a piece of piece of baking paper and top with another one. Roll it until you get a rough 40x30cm rectangle. Transfer to a baking tray and chill in the fridge.
Have a cup of coffee. And kisses. And maybe, even tickles down your neck. I highly recommend the latter. That’s what dream-Sundays are made of.
 half past one.
The détrempe is proved when it’s almost doubled in size. When you take it, it will be very smooth and elastic.
 half past one.
Place the détrempe onto a lightly floured work surface and roll into a rough rectangle. Wrap in clingfilm and freeze for twenty-five minutes to stop the yeast. Then transfer to the fridge and let it be for a few hours.
 five o’clock.
Tea time for some. And feuilletage for others. I can’t help but feel a little sad for the former who’ll never know the calmness only rolling dough can bring.
Take out the butter sheet on your bench to soften it ever so slightly. Place the détrempe onto a lightly floured work surface and roll to a 40x60cm rectangle. Flour more as needed but always make sure to brush off the excess afterwards.
 ten past five.
Place the rectangle of butter on the lower half of the détrempe – patching it as you do so to cover any naked corner – then fold the upper half over.
 fitfteen minutes past five.
Flatten the dough with your hands to get rid of any air bubbles, and rotate counter-clockwise so that you have a “book” its spine on your left hand-side.

twenty minutes past five.
Roll the dough before the first turn.
 For that, I like to press my rolling pin into the dough to create some indents. This step – if done gently yet with sufficient pressure – allows to distribute the butter evenly.
I then start rolling the dough in long movements, from the centre up and then from the centre down. Those two techniques can be applied to any laminated dough.
If the dough starts to stick, don’t hesitate to flour your work bench and reposition the dough.
 twenty-five minutes past five.
Once the dough has been rolled to – ideally – around seven millimetres, brush off any excess flour, and fold in three, like you would do with a letter.
This is a tour simple [simple turn].
Wrap the dough tightly in clingfilm and chill in the fridge for at least an hour.
twenty-five minutes past five (of the am kind).
I went for another simple turn as I’ve told you before. Because fluffy meant something special to me that day, or so it seems.
Of course Karl wouldn’t wake up, so pictures didn’t happen, but here is what I did: I rolled the dough to around seven millimetres thick, then folded it in three, exactly like shown above.
After that, I placed the dough back in the fridge – again, wrapped in clingfilm.
If you wanted a flakier texture, I would advise to go for another tour simple [simple turn] now.
 half past six (of the am kind).
Get two baking trays lined with baking paper.
Roll the dough on a lightly floured surface to a rough thirty-centimetre-wide rectangle. Cut the dough in half width-wise (if that’s even a thing) and place one half onto one of the prepared baking trays. Chill while you get on with the other half.
This will make the dough easier to handle and roll thinner, while the other part stays cool.
Keep on rolling the dough, maintaining a width of around thirty centimetres, until it’s about four or five millimetre-thick.
Cut triangles using a sharp knife, making sure their base is eight to ten centimetre wide.
As you cut the triangles, place them onto the prepared baking tray; and keep in the fridge until needed.
Repeat the rolling and cutting process with the other half of dough.
 seven am.
Get two baking trays lined with baking paper.
Take out a couple of dough triangle out at a time. Gently stretch them, then roll without putting any pressure on the layers. And place them with the “point” underneath on the prepared baking tray, generously spaced out.
 twenty minutes past seven.
Layer two large pieces of clingfilm, chasing any air bubbles and lightly brush with vegetable oil.
 twenty-five minutes past seven.
Place the layered clingfilm – oiled side down – on top of your croissants, to cover them loosely. Allow to prove at room temperature for around two hours or until wobbly and doubled in size.
If butter starts leaking, then you might want to find a slightly cooler place to prove your croissants. If I’m at the restaurant, then 26°C is the temperature I go for (with 65% humidity for the ones of you who are lucky enough to have a prover).
Once the croissants have proved, brush gently with a beaten egg, making sure not to put any egg-wash on the cut edges, which would prevent the rise of the feuilletage.
Bake at 200°C for seventeen to twenty minutes. Allow to cool down slightly, then transfer to a wire rack.
 ten thirty.
Make the sugar and vanilla glaze: mix the icing sugar with enough water to form a pourable icing; stir in the vanilla seeds, and drizzle over the croissants.
THE END. Of life as you knew it.
Leave a Reply