Tag: recipes

  • Brioches feuilletées au sucre

    Brioches feuilletées au sucre

    [Flaky sugar brioches]

    Today, it hailed three times. Rained once. And snowed twice. With the sun being at its brightest in between. Yes, I think April showers take a whole new meaning here.

    Some other things do too.
    In fact, I started this post in my head – perhaps yesterday, or even the day before – by telling you how busy this week has been. But as I’m writing this now – dressed with wool from head to toes, and sitting at the little wooden table that stands by the stacked firewood; hot chocolate in one hand, computer in the other, pink sunset and all – I’m forced to re-evaluate my Swedish version of busy.

    Especially when, just a few months ago, busy meant an eighteen-hour day on a three-hour night. A few hundreds of covers and the mise-en-place to match.

    These days, busy has been more like taking walks and pictures. An occasional visit to the city we’ll call home from this Monday. Perhaps, a batch of croissants; twelve of them. Or some choux, with a vanilla cream just so. A few hours spent unpacking the boxes we brought from London. And packing the essentials again. A loaf of bread; a large one mind you, but still: one. Uploading all my recipes (well, as of now, I’m about one percent into the process) to – what I think is going to be – the best/easiest/cleanest recipe database ever.

    Brioches feuilletées au sucre

    Adapted from Philippe Contincini's Sensations.
    One day last week, after yet another croissant batch, I thought I give myself a break and make Philippe Conticini's brioches feuilletées. They'd been on my must-make list for ages, and I think they'll stay on my weekend-breakfast list for ever.
    Not only the dough – slightly drier than my go-to brioche – is a wonder to work with while laminating, but the brioches still taste amazing the day after; which makes them perfect for lazy Sundays.
    You could make the dough on Friday night, laminate and shape on Saturday. And either bake them in the afternoon or proof them overnight in your fridge (although the pearl sugar might melt from the humidity). The next morning, leave them well covered at room temperature for an hour or so, while you preheat your oven.
    While I won't cover lamination today, as you can see a step-by-step over here; there is a few important points for these brioches.

    Notes

    On adding the butter from the beginning
    Since the quantity of butter in the dough is so small, I add it along with the rest of the ingredients at the beginning of the mixing stage. It’s not something I’d ever do for my usual brioche as it has 10 times more butter which would slow down gluten development, even making it impossible to form in some parts of the dough, which would result in a patchy non-emulsified mess.
    On my process for brioche dough
    As with every brioche dough I make at home, I like to place my dough in a container and clingfilm it to the touch with several layers of clingfilm; and chilling it in the freezer for 30-45 minutes, before I leave it in the fridge overnight. This cools down the dough quickly – a necessity to avoid over-fermentation, which might happen since the dough gets fairly warm with the kneading friction (especially if like me, you’re kneading by hand).
    On pearl sugar
    The best pearl sugar for this recipe is Beghin Say Sucre Grain, which I always stock up whenever I’m in France! You can order some online here. 
    Make sure that once you’ve sprinkled the dough with pearl sugar, you run your rolling pin over it to make the sugar stick to the dough; and don’t forget to brush the edge of the dough with syrup; this makes sure your rolls stay tight as they bake.
    On using a muffin tin
    In fact, I think those would be amazing proofed and baked in a muffin tin – although I haven’t tried since I don’t have one here. I did try to bake the brioches in rings though, but I didn’t get the lovely domed shape as my rings were too small and compressed the dough slightly.
    Author: Fanny Zanotti
    Prep Time1 hour
    Cook Time30 minutes
    Total Time13 hours 30 minutes

    Ingredients

    • 510 g strong flour
    • 40 g caster sugar
    • 20 g fresh yeast
    • 7 g sea salt
    • 150 g whole milk
    • 150 g eggs
    • 50 g soft butter
    • 300 g butter for tourage

    For the simple syrup

    • 100 g caster sugar
    • 100 g water

    To fill

    • 150 g pearl sugar

    Instructions

    • Place all the ingredients aside from the tourage butter in a large bowl, and mix until it forms a dough. Transfer to a clean work surface and knead until smooth and elastic; around 15 minutes by hand (if you're using a stand-mixer fitted with the hook attachment, check the dough after 10 minutes as gluten will develop considerably faster). Wrap in clingfilm and chill in the freezer for 30 to 45 minutes, until hard but not frozen; then transfer to the fridge overnight.
    • Make the syrup: bring the sugar and water to the boil, and allow to cool down at room temperature.
    • The next morning, cut the butter into 5mm thick slices and arrange on a large piece of baking paper. Roll to a 20x30cm rectangle.
    • Lightly flour your work surface and roll the dough into a 20x60cm rectangle. Place butter on lower half, then give the dough three tours simples, with at least 30 minutes of rest in between each.
    • Chill the dough for an hour, then roll into a 35cm wide rectangle, around 5mm thick and 60cm long.
    • Sprinkle the dough with the pearl sugar leaving a 5cm margin on one edge. Roll lightly using your rolling pin for the sugar to stick to the dough; then brush the “naked” edge with syrup.
    • Roll tightly, then wrap in clingfilm and chill in the freezer for 30 minutes, seam-side down.
    • Trim and slice into 4.5cm logs; or divide the dough in 12.
    • Place into two muffin tins, 6 rolls in each so they have plenty of space.
    • Cover loosely with clingfilm and proof for around 2 hours (at 24°C for me).
    • Bake at 190°C / fan 170°C for 30-35 minutes, or until golden-brown. Brush with the remaining syrup when still warm.

    PS. The pictures above were taken when I made half a batch of brioche. So, in case you wondered, that’s why my finished log of dough is only around 30cm long and not 60 as yours would be if you decide to make a full batch.

  • Canelés au beurre noisette et au bourbon

    Canelés au beurre noisette et au bourbon


    [Brown butter and bourbon canelés]

    There are stories that never get old, no matter how many times you tell them. Here is a collections of the ones I never-ever want to forget.

    Every evening, we go to the pond by the house on the other side of the path. Just before the sun sets. From there, we overlook the far-away lake. But really, all I care for are the frog’s eggs floating on the surface not unlike tapioca or soaked basil seeds. For some reason I find them absolutely captivating, and I’m crossing my fingers for us to stay here long enough to see them turn into tadpoles.

    One morning, Svante asked me if I had woken up early. I had, but I very well knew that he meant 4am early. Yes, he’d heard some noise coming from the forest.
    After we’d had coffee, and a tartine of sourdough bread smeared with butter and topped with hard-boiled eggs and pickled herring, we put our gumboots on and walked through the moss and woods and snow.
    As we followed the tracks, dipper and dipper into the woods, the three of us knew one thing for sure. It was a lynx.

    Yesterday, as I was sitting on the front steps of the little house – my favourite morning spot to catch the sun and drink up that mug of too-hot coffee – Svante called me from the path. A few metres from us: two rådjur [deers, don’t ask me for the plural form of their Swedish names as I’m still very confused about it all] were eating the grass that the snow-melt made alive again.

    The shooting stars we see at night. When it’s so dark we can almost make out the Milky Way.

    Every morning, I wake up early. The oven gets turned on and the loaf of bread – of dough, really – that has been slowly fermenting in the fridge overnight, is taken out and left on the counter. Some days, I’ll make coffee. Others, I go back to bed with a book, and – more often than not – I fall back asleep for an hour or so.
    The bread goes in the oven and I patiently wait. One morning, we carried firewood from the shelter where it dries up to the main house. On a wheelbarrow. Another time, we went on the rock at the top of the road, where you can watch the sun rise, almost like no other place I’ve ever been.

    Bonus campagne tale: I’ve found out that it’s actually way easier to drive on snow and ice rather than mud. The rest should probably remain untold.

    Canelés au beurre noisette et au bourbon
    Adapted from Pierre Hermé.

    I didn’t grow up eating canelés. In fact, I can’t even remember the first time I ever had one. But if I was to guess, I’d say it came frozen, from a box of miniature ones found at Picard (and if you’re not French, I should add that Picard is a frozen-product shop found everywhere across the country).

    But somehow, they’ve always seemed fascinating. A crisp almost-burnt-but-not-quite crust and custard-like crumb.

    I can’t say I’ve tried a lot of recipes, as when I first tried the ones at Pierre Hermé – back in the summer 2007 during the three-month stage that would change my life – I never even wanted to look back.
    Yes, Pierre Hermé’s recipe is my favourite.
    I’ve made them traditional, with Tahiti vanilla and aged rum. Or at times, with chocolate in the batter too. Even some pumpkin and cinnamon ones, replacing the milk with roasted pumpkin flesh and a large tablespoon of milk powder, and adding bourbon and brown butter.
    I loved this combination so much that I’ve decided to make some simpler ones today.

    I’m not going to lie, it’s not quite easy to get them right. But here are a few notes that will help you get those beauties perfect every single time.

    1. The batter must be made in advance. In a pinch, I’ve made it rest for only an hour with great results, but they are considerably better if the batter is left to rest at room temperature for at least 12 hours or in the fridge for up to 3 days.

    2. As you make the batter, the milk should be around 55°C when you pour it onto your egg mixture. This will start to cook the eggs and the starch, and will prevent the canelés to form too much moisture when they bake, hence reducing the risk of them “growing” out from their moulds as they bake.

    3. No matter what I do, I’ll always have at least one canelé trying to escape from its mould during baking. If you let it be, you’ll end up with a white-topped canelé as the batter won’t be in contact with the mould; you do not want this, trust me. My sauve-qui-peut solution is very simple. As soon as the canelés are set enough – around 20 minutes usually – I’ll carefully take out the faulty ones out from the oven, then turn them upside-down – unmoulding them really – then place them back into their moulds. This seems to do the trick every time and they won’t try to escape again.

    4. Many people stress about using a mixture of oil and beeswax to grease the moulds. Yes it does give them a special matte finish, but more than that, I think the kind and quality of the moulds matter. I know they’re expensive but Matfer copper moulds make the difference for me.
    You see here, I didn’t use any beeswax, just melted butter, brushed inside the moulds, and they came out beautifully. You could also use some cooking spray, I’ve only ever tried OneSpray which worked great.

    5. The most fundamental part is – in my opinion – the baking. In professional fan-assisted ovens, I usually preheat to 210°C, then bake for 10 minutes at this temperature, before reducing it to 190°C to finish the baking for an hour or so. At home, in my traditional oven, I’ve found that they are considerably better if I preheat the oven to 270°C and bake them for 10 minutes then reduce the temperature to 200°C for another 45 to 55 minutes depending on the size of my moulds.
    I haven’t tried baking them in a home oven with fan, but I’m assuming that preheating to 250°C and baking at 190°C would work fine. Let me know if you try 🙂

    But mostly – please please please – have fun while baking. This makes all the difference.

    Canelés au beurre noisette et au bourbon

    Makes 20 small canelés (4.5cm wide) or 12 large ones (5.5cm wide).

    500 g whole milk
    50 g brown butter
    2 vanilla pods, sliced lengthways
    2 eggs
    2 egg yolks
    250 g icing sugar
    40 g bourbon
    100 g plain flour
    a pinch of salt

    q.s. melted butter, to grease the moulds

    In a medium pan, bring the milk, brown butter, vanilla seeds and pods to the boil. Off the heat, cover with a lid and allow to infuse for at least 15-20 minutes while you get on with the rest.
    In a bowl, mix the eggs and yolks with the icing sugar until smooth, slowly pour in the bourbon. Add the flour and salt.
    Then, pour the warm milk, a little at a time over the egg mixture, mixing as you do so – but trying not to incorporate too much air into the batter. You could pass the batter through a fine-mesh sieve, I don’t.

    Cover the bowl with clingfilm and leave at room temperature overnight.

    Preheat the oven to 270°C/fan 250°C (read note above).
    Prepare the moulds. No matter which kind of fat you’re using (read note above), brush a thin layer into the moulds (or in the case of the spray, spray it). Turn the moulds upside-down onto kitchen paper to allow the excess fat to drip, then place in the freezer. If using butter, I like to repeat this one more time.

    Mix the batter for a couple of minute to homogenise. Then fill your prepared moulds almost to the rim, leaving 2 or 3 mm on top.
    Bake for 10 minutes, then reduce the temperature to 200°C/fan 190°C and bake for a further 45 minutes for small canelés or 55 minutes for large ones.

  • Kusmark sourdough

    Kusmark sourdough

    I thought it would be nice to start my weekend boulangerie posts with a book quote. You know, being the weekend and all. Perhaps, you’ll want to do what I’ve doing and explore forgotten books.

    Yes, I’ve had time. To bake, to draw, to read.
    And yes, I’m extremely happy.

    On this subject, a few nights ago, we watched a documentary – in Swedish – about what used to be Frantzén/Lindeberg. It was unusually accurate and very interesting. I could relate a lot; with both Frantzén and Lindeberg, who were in two – very – different phases which caused them to separate. But really, I especially liked the part where Lindeberg – after leaving the restaurant – says (and I’m about to very badly paraphrase/translate him) that once you leave that intense bubble created by the constant need to reach perfection, you start to soak in the beauty of life that has been around you all these years without you even noticed.
    And while I don’t want to leave that bubble behind just yet, it’s certainly refreshing to be able to live without being consumed by a limitless passion that restlessly occupies every of your thoughts.

    “It was a pleasant May morning in 1775, and the air was filled with the fragrance of the freshly cut pine logs that had been poled down the river in big rafts to be cut into planks and boards at the big sawmills. The river, unusually full with the spring rains, dashed against its banks as if inviting the little girls to play a game with it. Usually Anna and Rebecca were quite ready to linger at the small coves which crept in so near to the footpath, and sail boats made of pieces of birch-bark, with alder twigs for masts and broad oak leaves for sails. They named these boats Polly and Unity, after the two fine sloops which carried lumber from Machias to Boston and returned with cargoes of provisions for the little settlement.
    But this morning the girls hurried along without a thought for such pleasant games. They were both anxious to get to the lumber yard as soon as possible, not only to fill their basket with chips, as their mother had bidden them, but to hear if there were not some news of the Polly, the return of which was anxiously awaited; for provisions were getting scarce in this remote village, and not until the Polly should come sailing into harbor could there be any sugar cakes, or even bread made of wheat flour.”
    Alice Turner Curtis (1920), A Little Maid of Old Maine

    Kusmark sourdough
    Adapted from Jeffrey Hamelman’s Bread: A Baker’s Book of Techniques and Recipes.

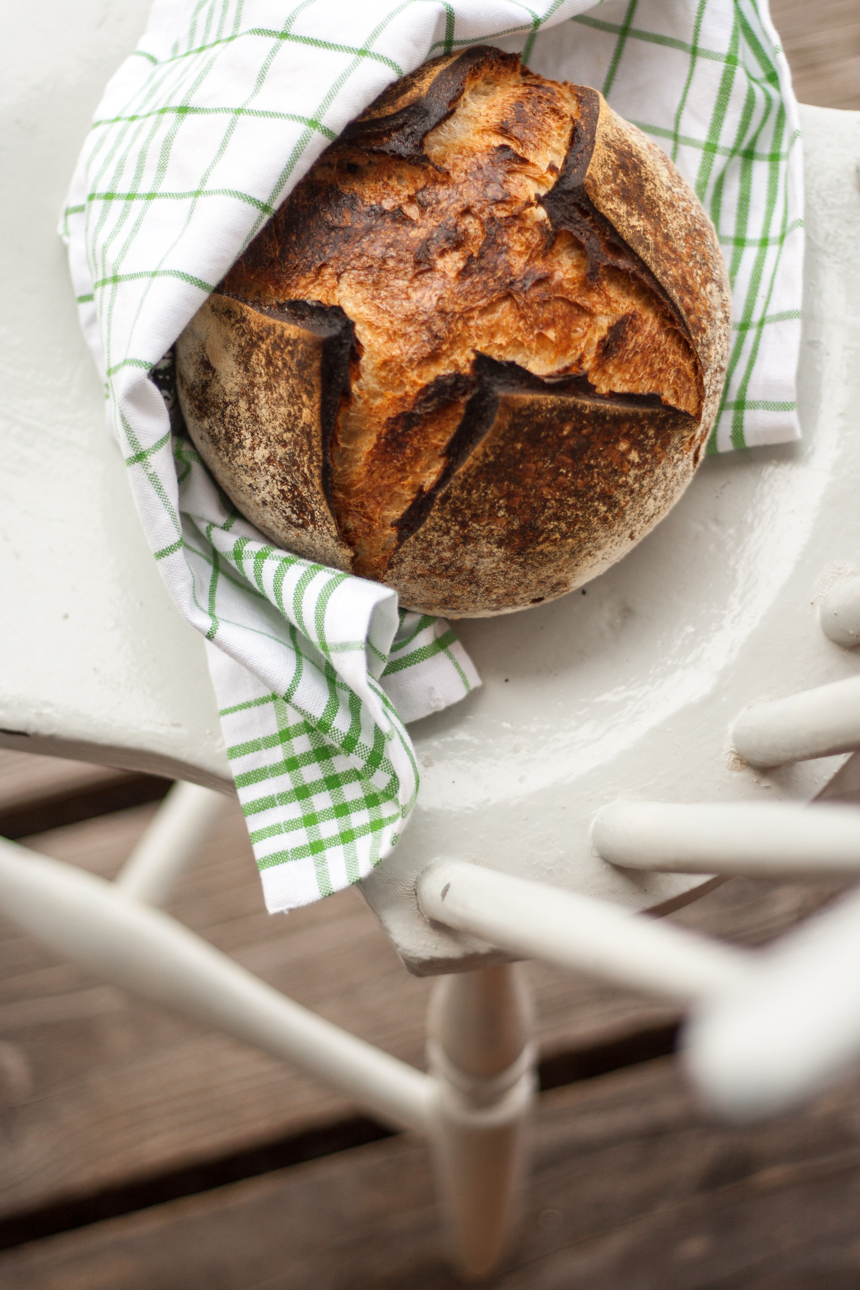
    You know those times when you know you’re doing something wrong, but you decide to go ahead and do it anyway. When, this was me, all over this bread. And yet, it turned out beautifully.
    A lovely chewy crumb, with a wonderful sourdough aroma – yet not too strong – and a dark crisp crust.
    I had a slice with a little butter and that Swedish flaky salt I’ve fallen in love with; the bread still slightly warm and the butter oozing on my fingers.

    The dough felt quite dry and gluten development was very fast. I guess I’ve gotten too used to my usual 75% hydration sourdough and this one being only 65%, it was surprisingly easy to work with.
    Yes, I do think it’s one of those magic breads that can absorb mistakes. Perhaps, a new go-to.

    I’ve named it Kusmark sourdough as it is apparently custom to name your bread according to the geographical location of your starter. And really, I thought it sounded great.

    The recipe.

    Makes one boule.

    The recipe is based on Jeffrey’s Vermont sourdough, which seems to be loved by many.

    75gT55 flour100%
    95gwater125%
    15gstarter20%
    for the dough
    375gbread flour90%
    50gwhole rye flour10%
    231gwater65%
    169glevain
    9.5gsalt1.9%

    The ingredients.

    Jeffrey recommends to go for a 12% protein flour for his levain breads. So I went ahead and used my Kungsörnen vetemjöl special and the Saltå Kvarn rågmjöl that I’ve also been using to feed Surdeg these past few weeks.

    The latter seems to absorb slightly more water than what rye has gotten me used to, so if you’re using the same flour, you might need to adjust the hydration slightly.

    Starter used: Surdeg (19/03/2015), 14 days old.

    The timing.

    Mixing the dough & autolyse = 1 hour-ish.
    Bulk proofing = 3 hours, with one or two folds.
    Pre-shaping, bench rest & shaping = 35 minutes.
    Fermentation = at room temperature, for around 2-3 hours or 1 hours at 20°C then retarded overnight (for up to 16 hours according to Jeffrey) at 5°C.
    Baking = 45-60 minutes, depending on the size of your loaf.

    The process.

    While I’m a bit of a perfectionist when working, I must say that I’m way more laid-back when it comes to home baking. In my mind – perhaps because I’ve spent so much time being insanely precise – I really like the nonchalance of baking at home. Yes, the oven isn’t perfect. Yes, the dough temperature might be too high or low. Yes, you will fail. But I’ve learnt to appreciate all of these. Maybe that will change, but for now, I’m pretty happy to take it for what it is: trying to make the best things possible in a home kitchen environment.

    That means, I’m not going to lie, that:
    – I didn’t measure dough temperature, even though I know they’re important. I adjusted the water temperature slightly to have a dough slightly warmer than 23°C, which I measured with my hands. There you go probe.
    – I don’t have a banneton to prove my loaves, but a bowl lined with a floured kitchen towel.
    – I didn’t score my bread using a lame – but a small serrated knife.

    Other than that, here is the process I followed.

    Make the levain.
    In a bowl, mix your active starter and water. Add the flour and mix until smooth. Cover with clingfilm and allow to ferment overnight.

    Mix the dough & autolyse.
    In a large bowl, combine the levain, water, and flours until it just forms a dough. Leave covered for an hour.

    Bulk proofing.
    Add the salt and knead the dough to medium gluten development. The dough will feel elastic and smooth but slightly loose.
    If you’re feeling like it, Jeffrey tells us the dough should now be 24.4°C.
    Cover with clingfilm and leave at room temperature to proof for around three hours.

    Folds.
    My gluten development being a bit more than medium, I only gave the dough one fold. To give a fold, simply place the dough, “nice side” down on a slightly floured surface (I didn’t need any flour here) and pat with the palm of your hand into a rectangle. Then fold like a business letter. And again in the other direction. Place back into the bowl, and keep on proofing.

    From the very beginning till the end of the process, make sure to keep the “nice side” – or seamless – of your loaf as is. While the other side will always be the one with seams.

    Shaping.
    Place “nice side” down onto a lightly floured surface. Pat down with the palm of your hand to degas the dough. Pre-shape the dough into a rough ball. Then cover it with a cloth – leaving its “nice side” down so not to put any flour on the seams and leave for around 30 minutes. In the meantime, get your banneton – real or homemade – ready. Then shape the dough into a tight ball, on a clean surface; the sticky dough will pull the outer layers creating some surface tension.
    Place the dough seam-side up into your banneton if you intend on scoring the bread. Or for a more natural look, place the seam-side down to let the natural cracks bloom in the oven.

    Fermentation.
    You can either ferment your loaf at room temperature until doubled in size and a positive finger poke test, or proof for around an hour before wrapping it in clingfilm or placing it in a sealed bag, and retard it in your fridge for up to 16 hours.

    I went for the latter. But I think my fridge was too cold as barely any fermentation happened overnight and I had to leave my bread to proof outside for another two hours in the morning before it was ready to go in (slightly underproofed, but I had reached my patience limit).

    Scoring.
    Unmould your loaf onto a piece of baking paper, big enough for you to lift the bread to the cast-iron pot. And score into the pattern of your choice.
    Scoring weakens a portion of the outer dough layer, creating the perfect escape for steam during baking and the cuts will expand in the oven, making sure your bread gets to its full volume.

    Baking.
    Preheat the oven to 250°C for at least an hour before your bread is ready. You can preheat a cast iron pot as well, although I’ve baked bread in a cold pot before with great results. It’s really up to you, although I do think a hot pot will generate a better oven spring.

    I choose to bake in a cast-iron at home for two reasons:
    – it removes the need for a stone: cast iron will accumulate heat, just like a stone would. A hot cast-iron pot will prevent your bread from sticking and has amazing heat retention properties, which means it’ll keep your oven hotter and provide a real nice hot base for your bread to bake on.
    – the bread steams itself: by placing a lid on top of your pot, you allow the steam that comes out from the bread to stay in a closed environment, hence acting as a steamer.
    Yes, steam is essential for a good crusty bread that has a lovely oven spring. As the steam moisten the surface of the bread – retarding the gelatinisation of starch, a process which starts at around 60°C – it will increase the volume of your loaf and turn the crust into a shiny surface.

    I baked mine at 250°C for 20 minutes with the lid on and then 30 minutes without. A quick way to check if your bread is done is to probe its centre. It should read 96-98°C for a sourdough bread.

    Notes.

    Next time, I’ll increase the hydration to 70%, to – perhaps – get a more open crumb.
    I also need to check my fridge temperature to make sure it’s not too cold.

    Perhaps, I’ll use a lower protein flour, around 10.5-11% proteins.

    Vermont sourdough ressources.

    Jeffrey Hamelman’s Bread: A Baker’s Book of Techniques and Recipes

    The fresh loaf’s posts on Vermont sourdough.

    R.F. Tester & W.R. Morrison (1990), Swelling and gelatinisation of cereal starches.

  • Macarons au chocolat blanc caramélisé et aux noisettes

    Macarons au chocolat blanc caramélisé et aux noisettes

    [Caramelised white chocolate and hazelnut macarons]

    I’d like to tell you I’ve made macarons today. I had planned to. Really. Last week, we bought mandelmjöl [ground almonds] and florsocker [icing sugar]; mjölkchoklad [milk chocolate] and vispgrädde [whipping cream].

    But you see, we’ve been for walks everyday. At times, in the forest. Or by the river. And, always, in the snow.

    And the chocolate bars we wrapped in foil – along with kokkaffe and the old kaffekanna [coffee pot], perhaps a square or two of Tatin tart salted caramels too, and a few baconost [bacon cheese] sandwiches that K. loves to make with lingonbröd [lingonberry bread, which I’ve seen an amazing recipe for here, and I can’t wait to go pick lingonberries to make it] – well, they’re gone.


    Yes, I wanted to make moka macarons, but we’ve eaten all the chocolate before it even got the chance to be turned into a whipped ganache, just so.

    Instead, we made the most of last night snowfall. For K. and Kaiser, the not-so-puppy-anymore you’ve perhaps seen on my pictures, it most likely involved effortless runs over the ice. For me, it means that the one patch of slippery mud will land me somewhere I didn’t decide to. Repeatedly 🙂

    Macarons au chocolat blanc caramélisé et aux noisettes

    When I realised I had never posted a recipe for macarons, I couldn’t believe it. It’s not like I haven’t spent the last seven years of my life making some almost daily. Pistachio and vanilla were ranking high amongst all. But I’ve also made some with elderflower and champagne, fermented mango, coconut and lime, salted caramel, avocado and chilli, pumpkin and cinnamon, rhubarb and cream. Even beetroot and orange ones. The list could go on for – almost – ever, really.
    And that’s what I love about macarons, how versatile they are.

    These ones are made with caramelised white chocolate – a love of mine, and roasted hazelnuts.
    At times, I like to fill my macarons with a crémeux instead of a ganache to lower the sweetness slightly. However, macarons made with crémeux will only keep for a couple of days in the fridge before getting a bit too moist. They will keep beautifully frozen though, and judging by how many times I’ve seen our container in the freezer getting emptier and emptier, I’m sure some chefs – whose names will remain undisclosed – can vouch for it.

    The recipe for the shells is adapted from Andrew Gravett’s beautiful macarons. He’s an amazing pastry chef and person, and I couldn’t be anymore grateful to have followed him in one way or another during my six years in London.
    It’s super-foolproof. And trust me, this is something you want your macarons to be.

    The stages are quite simple really: start by making a smooth tant-pour-tant, for this I like to use extra fine ground almonds as they give a more flawless finish.
    Then make an Italian meringue, which you fold into the almond mixture and the extra egg whites.
    After all is incorporated, you’ll deflate the batter slightly. This step, called macaronage, can be done with either a maryse or a plastic scraper. I like to use a plastic scraper and push the batter against the sides of the bowl until I have the correct texture. Now, it’s quite hard to describe the texture of the finished macaron batter: it should almost form a ruban and when the batter drops, it should smooth out into the rest, leaving only the tiniest bump.

    If you’d like I could write a little post about macaron troubles and what they mean. Perhaps we’d call it the macaron doctor?
    In the meantime, here are a few notes on macarons:
    – flat and odd shaped macarons with bubbles mean your batter was over-mixed.
    – gritty macarons with a pointy top means your batter was under-mixed.
    – cracked shells can mean two things: too much humidity in your kitchen/oven or your oven temperature is too high.
    – shells that stick to the silicon mat: try to bake them a minute or two longer.

    Macarons au chocolat blanc caramélisé et aux noisettes

    makes around 40 macarons

    for the caramelised white chocolate
    100 g white chocolate

    Preheat the oven to 180°C/fan 160°C. Place the chopped chocolate onto a baking tray lined with a silpat. Bake for 8 minutes, or until the chocolate is golden-brown. Take out from the oven, and using an off-set palette knife, work the chocolate to even out the colour and smooth it out. Allow to cool down while you get on with the rest.

    for the hazelnut paste
    300 g blanched hazelnuts

    Preheat the oven to 165°C/fan 145°C and roast the halzelnuts for 20-25 minutes, or until golden-brown. Save 100g to chop for decorating shells. And blitz the remaining 200g in a mixer until you have a smooth paste, around 8 minutes.
    This will make more than you need, but you can keep it in a container in the fridge for later use.

    For the caramelised white chocolate and hazelnut crémeux
    1 g gelatine 200 bloom
    50 g hazelnut paste
    60 g caramelised white chocolate
    50 g milk
    50 g 35% cream
    a fat pinch of salt
    1 egg yolk

    Soak the gelatine in ice-cold water. Place the caramelised white chocolate and hazelnut paste in a bowl.
    Bring the milk and cream to the boil. Pour onto the egg yolk, whisking as you do so. And return to the pan. Cook over low heat to 80°C, stirring at all times with a silicon spatula. Off the heat, add the squeezed gelatine. Then pour onto the white chocolate in three times, emulsifying well to create a glossy core. Handblend for 3 minutes to emulsify further.
    Transfer to a container and clingfilm to the touch. Chill for at least 4 hours or up to 3 days.

    For the macarons
    150 g icing sugar
    150 g ground almonds
    55 g egg whites
    150 g caster sugar
    50 g water
    55 g egg whites
    15 g caster sugar

    100 g roasted hazelnuts, chopped and cooled down

    In a small blender, blitz the icing sugar and ground almonds for a couple of minutes, pulsing so it doesn’t overheat the nuts. Tip into a large bowl and add the egg whites. Mix to a smooth paste and cover with a damp cloth.

    Place the sugar and water in a small pan and cook over medium het to 118°C.
    When the syrup reaches 110°C, start whisking the egg whites on low speed. When soft peaks form, add the caster sugar, a little at a time, keep on whisking until stiff peaks form.
    Wait for the syrup to stop bubbling – around 30 seconds or so – and pour over your meringue, whisking as you do so, along the sides of the bowl to avoid splashes. Once all the syrup as been incorporated, increase the speed to medium and keep on whisking until the meringue is around 50°C.

    Add the meringue to the almond mixture and fold in using a maryse. Then deflate slightly until you get a ribbon.

    Pipe the macarons using a 9mm nozzle onto a baking tray lined with a silpat. Around 3cm wide. Immediately sprinkle with chopped hazelnuts.
    Leave the trays at room temperature for around 30 minutes, or until a skin forms and the macarons no longer feel tacky.

    Bake at 160°C/fan 140°C for 12 minutes.

    Allow to cool down completely, then turn the macaron and fill them with the crémeux using a 11mm nozzle.
    Freeze on a baking tray, then put away in an air-tight container.

  • Cake à la banane rôtie

    Cake à la banane rôtie

    [Roasted banana cake]

    I once read that the universe didn’t need another banana cake. In that case, the universe and I might have to disagree.

    We don’t disagree often though.
    In fact, most of the time, we’re in a symbiotic agreement that all is in its place.

    Let me tell you about a few nights ago.
    It might have been Monday or Tuesday, I don’t know for sure, although I’d think it was Tuesday.

    K. and I took a walk at dusk. With very diffuse clouds above our heads. And right after K. told me they might – perhaps – be northern lights not clouds, the sky turned into a beautiful firework of magnetic fields. Greens and purples. Right above. Reflecting in the snow around us.

    And just like last week, when I saw norrsken for the very first time, I stayed there. Looking up until they melted back into the sky, leaving place to constellations and satellites.

    On our way back, we could still see them in the distance. And as a truck drove past – carrying wood that would become something else – it smelled of walks in the forest. Those of the kind I cherish so much now that the snow is slowly melting, uncovering – everyday a bit more – grass and bushes. Yes, I never want to forget the snow.

    I don’t want to forget this morning either. When I sat in the sun, with a cup of coffee and a slice of banana cake. I was wearing leggings and a thick sweater, oh, and the scarf my mum gave me right before we left France.
    Because, you see, I had bananas on the kitchen counter – the one made of the somewhat retro plywood – ripe and spotted. And we all know it can only mean one thing: banana cake.

    Yes, perhaps the universe doesn’t need another banana cake. But I did.

    Cake à la banane rôtie
    This cake will keep for days, well wrapped in clingfilm. In fact, I think it’s even better a day or two after. In fact, it keeps so well, that I almost always make a double batch to have cake all week long.

    Some of you might want to skip the roasted banana purée if you’re in a hurry, and although I love the combination of roasted and fresh bananas, it will work almost as well if you choose to use only mashed fresh bananas. In this case, simply use three large ones, around 300-320g.
    You could also make a rum glaze or a mascarpone frosting, but I think banana cake is one of the many things that are better eaten naked.

    A few notes on method, the honey, piped butter, and baking temperature:
    I do not let the butter come at room temperature whenever I cream it, as it will soften as you work it. And especially, in this recipe, because we add the warm banana purée which makes the whole softening process much faster.

    The honey in this recipe, because it is an invert sugar, is used to bind with the water contained in the bananas, and make sure the cake will keep moist but not soggy for almost ever.
    The flavour of honey is fairly subtle and complements the banana well.

    As you now know, I’m very fond of this technique to get a neat crack on top of loaf cakes. I always pipe a thin line of soft butter on top of my unbaked loaf, using either a piping bag or even easier a paper cornet (remind me to show you how to fold one).
    When the batter starts to rise, the butter will sink in, creating a neat crack.

    When it comes to loaf cakes, I always like to bake them at high temperature and then reduce to finish the baking. I usually do 5 minutes at 180°C, 10 minutes at 170°C, and 25-30 minutes at 160°C.
    For this banana cake, given how much moisture there is, I’ve found I get better results with 20 minutes at 180°C and then around 30 minutes at 160°C.

    Cake à la banane rôtie

    makes one large loaf cake

    For the roasted banana purée
    2 large bananas, with skin on
    50 g caster sugar

    For the caramelised roasted bananas
    160 g plain flour
    1 1/2 tsp baking powder
    1 tsp sea salt

    180 g butter
    130 g light brown sugar
    50 g creamy honey
    200 g roasted banana purée
    1 banana
    , (approximately 100 g) mashed with a fork
    3 eggs, at room temperature

    10 g butter, at room temperature, to pipe on top of the cake

    Start by making the roasted banana purée.
    Preheat the oven to 180°C and place the bananas – skin-on – on a baking tray lined with baking paper. Prick a few holes into the fruits using a small paring knife and roast for 15 minutes, or until black with juices coming out. Allow to cold down until cold enough to handle.
    In a small pan, cook the sugar over low heat to make a light caramel. While the sugar is cooking, peel the bananas, being careful not to burn your fingers.
    When the caramel is just light brown. Take off the heat and add the bananas. Return to the stove, and cook slowly – stirring frequently to dissolve any bits of caramel that might have seized – until you can see the bottom of the pan as you stir, not unlike jam. Transfer to a bowl and allow to cool down for 15-20 minutes.

    In the meantime, butter and line a 1L loaf tin.
    In a bowl, combine the flour, baking powder and salt. Set aside.
    Place the cubed butter, sugar and honey in a large bowl, and cream for around 3 minutes. Add the banana purée and the mashed banana, and mix for a further minute.
    Add the eggs, one at a time, mixing for a minute after each addition.
    Add the flour and mix until just smooth. Scrape the batter into the prepared loaf tin, pipe a line of soft butter on top of the cake.
    Bake in the preheated oven for 20 minutes, then reduce the temperature to 160°C and bake for another 30 minutes or until a knife inserted in the centre of the cake comes out clean.
    Unmould immediately, placing the cake on its side. Cool down completely.

  • La tarte tropézienne

    La tarte tropézienne

    There is the sound of the icebergs bumping into each other with every wave, not unlike a distant thunderstorm. There is the forest that I’ve walked through so many times before, now covered in a thick blanket of snow. There are lakrits [liquorice] cookies in the oven. And lights by every window we see.

    Yes, this is it. Sweden.

    And really, it’s just as wonderful in the vinter [winter] as it’s ever been in the sommar [summer].

    What’s up with the Swedish words? Well, I need to learn. And if I was ever able to speak English by writing about food back-back-back in the days. I’m hoping the same will – almost magically – happen with Swedish.
    But I’ve found some amazing companions. Just yesterday, I saw Donal on television. Perfect accent and all. And today, I went to buy Linda’s beautiful baking books, which I’m utterly in love with.

    In fact, I’ve been keeping an eye on every blueberry bush – how wonderful it is to walk surrounded by blåbär och lingon [blueberries and lingonberries] – waiting, very impatiently, for summer to make blåbärssylt [blueberry jam], blueberry crumble tartlets and Linda’s blåbärsrutor [literally, blueberry squares/boxes].

    The tartes tropéziennes here have barely anything to do with it all. Perhaps that’s why it took me so long to tell you about them.
    But when Karl ate one, he said they reminded him of semla. So there is that. And I might have to make some semla inspired tarte tropézienne very soon.

    La tarte tropézienne
    Adapted from Paris Pastry Club.

    Back when I was a child, you could only buy a tarte tropézienne in St Tropez. We would drive through les Maures, a natural reserve not unlike the savanna. The road meandered between cork oaks and arbousiers [strawberry trees].

    It was the late 80s and St Tropez still had a fishing village vibe to it. Nothing compared to what it once was, yet nothing compared to what it’s now become.

    We would walk along the port, and through the market. Sometimes, we’d go up to the fort, the best view over the gulf.
    And, before we’d leave, we’d always stop at the boulangerie to get a tropézienne. A brioche filled with crème madame – pastry cream with butter and whipped cream; delicately flavoured with orange blossom.

    When I wrote Paris Pastry Club, more than gimmicky or trendy recipes, I wanted to share my absolute favourite basics. Ones you can tweak endlessly, creating an amazing répertoire of recipes to call your own.
    And when I see all your beautiful creations on instagram or on your blogs, I’m blown away. And so so so proud to inspire you – at least a little, with my words.


    These tartes tropéziennes are just this.
    A tweak on two recipes from my book. The brioche, also known as the last brioche recipe you’ll ever need, and the crème mousseline, turned crème madame for the occasion, from the fraisier (and please, as soon as the strawberries will actually taste like they should, please, make one on a Saturday, and have it for Sunday lunch, trust me on that).


    A few notes on the brioche:
    – I made half a batch in my stand mixer without problems, but it did take a little longer than the usual double batch. If I were you, I’d make a double batch, use half for tropézienne buns and shape the other half into a loaf, which you can then bake, slice and freeze for instant morning happiness.
    – Here I’ve used T55 flour, but you could also use plain flour, although make sure the protein content of your flour is around 10-12g per 100g of flour.
    The higher the protein content, the stronger the flour is, which means it has more gluten. I’ve found that for brioche, I like to use flours with eleven percents of proteins.
    – When you knead the dough, I recommend doing the windowpane test after around ten minutes. It’s kneaded enough wuen you can stretch a walnut-sized piece into a very thin membrane without it tearing apart. This stage is called full gluten development, and for my brioche recipe, it’s usually reached after 10-12 minutes of kneading in the stand mixer on medium speed. If the dough tears when you try to stretch it, simply knead for a couple more minutes before testing it again.


    – Balling the dough isn’t only done to shape it. It’s an essential step to even the distribution of gluten strands, creating a tension layer, and making sure that no large air bubbles are formed.
    To ball the dough correctly, start by portioning your brioche in even piece (I like to weigh them out so that they will proof/bake evenly). Once you have divided your dough, dip the top side in flour and dust off any excess. Place the unfloured side down on a clean work surface and roll gently with the palm of your hand in a circular motion so that the outer layer of the dough stretches into a smooth ball.

    A few notes on the crème madame:
    – Crème madame is a crème pâtissière to which butter and whipped cream have been added. It should be firm and glossy, and will set into a rich cream.
    Really, crème madame = crème mousseline + whipped cream = (crème pâtissière + butter) + whipped cream.
    – I’ve been writing a post about basic pâtisserie creams which should be published very soon.
    – For a detailed step-by-step how to make crème pâtissière, please check this article.
    – When making crème mousseline, start by creaming the butter using the paddle attachment of your stand-mixer until light and fluffy. Then add the cold crème pâtissière in batches, beating well after each addition. If the butter has seized a little, simply place the bowl on top of a pan of simmering water for a few seconds before beating for a minute or two; or use a blowtorch to heat the sides of your bowl. Repeat until all the butter has disappeared and you’re left with a gorgeously thick crème mousseline.
    If you overheat the mousseline, it will become somewhat runny. Place in the fridge for a couple of hours, then beat for five minutes using the whisk attachment of your stand-mixer.

    La tarte tropézienne

    makes 8 individual tropéziennes
    For the brioche
    275 g T55 flour
    30 g vanilla sugar
    one tsp sea salt
    1/2 tsp instant yeast
    3 eggs
    30 g whole milk
    one tbsp orange blossom water
    160 g butter
    , thinly sliced

    one egg, beaten, for egg wash
    200 g pearl sugar, to sprinkle

    For the crème pâtissière
    500 g whole milk
    3 vanilla pods
    4 egg yolks
    150 g caster sugar
    50 g cornflour
    1 tsp orange blossom water

    For the crème madame
    600 g crème pâtissière (above)
    150 g butter, at room temperature
    100 g 35% cream, whipped to stiff peaks

    For the syrup
    100 g water
    70 g caster sugar
    one tbsp orange blossom water

    If you have a stand-mixer, fit the dough hook and mix the flour, salt and vanilla sugar together on slow speed. Add the instant yeast. Then pour in the milk, the eggs and the orange blossom water.
    Switch to medium speed and knead for 10 minutes, or until the dough can be stretched without breaking. Scrape the sides of the bowl every now and then to ensure everything is amalgamated.
    Alternatively, mix the ingredients by hand then turn out onto a floured work surface and knead until the dough can be stretched without breaking.
    Now, add the butter, one piece at a time, and when almost all of it is in, increase the speed and knead until smooth (or knead by hand). The dough should stop sticking to the side of the bowl (or work surface) and should be silky and very smooth, although somewhat tacky.

    Transfer the dough into a plastic container, clingfilm to the touch, and chill in the fridge overnight.

    Make the crème pâtissière.
    Bring the milk and vanilla pods and seeds to a rolling boil in a medium pan set over moderate heat.
    In a separate bowl, whisk the egg yolks and sugar to prevent the egg yolks from clumping. Add the cornflour and mix well until combined. When the milk has boiled, remove from the heat and pour a third of it over the egg mixture, whisking as you do so. This step is key when making crème pâtissière as it loosens the egg yolks but also tempers them, avoiding any lumps .
    Pour all of the egg mixture back into the pan, return to the heat and cook slowly, whisking at all times until it starts to thicken and boil.
    Once it has bubbled for a few minutes, transfer to a plastic container and clingfilm to the touch to avoid the formation of a skin. Chill in the fridge for overnight.

    Make the orange blossom syrup. Bring the sugar and water to the boil. Allow to cool down slightly, then add the orange blossom water. Reserve at room temperature overnight.

    The next day, scrape the dough from the container onto a clean and lightly floured work surface, gently press to degaz, and divide in eight 75g squares.
    Ball each square, then roll into a 1cm-high disk, roughly 8cmm wide.

    Arrange the disks of brioche onto a baking tray lined with baking paper. Cover loosely with a lightly oiled double layer of clingfilm; and proof until doubled in size.

    Preheat the oven to 200°C.
    Brush the brioche with the beaten egg, then generously sprinkle with the pearl sugar. Bake for 15-17 minutes, or until golden brown.
    Allow to cool down completely.

    In the meantime, make the crème madame.
    Cream the butter until light and fluffy. Add the crème pâtissière, one third at a time, beating well after each addition. Once all of the crème pâtissière has been added, beat for 5 minutes. The mousseline should be firm and glossy.
    If the butter has seized a little, simply place the bowl on top of a pan of simmering water for a few seconds before beating for a minute or two; or use a blowtorch to heat the sides of your bowl. Repeat until all the butter has disappeared and you’re left with a gorgeously thick crème mousseline.
    Finally, gently fold in the whipped cream.
    Place this crème madame in the fridge to firm up slightly for an hour or so.

    Once the brioches have cooled down, slice them in half with a large bread knife and generously brush the cut-side with syrup.

    Transfer the crème madame into a piping bag fitted with a 10mm nozzle and pipe the cream around the rim of the bottom brioches, then pipe a large ball in the centre.
    Top each brioches with their matching “hats”.

    Keep in the fridge, loosely covered with clingfilm for at least 4 hours or overnight.

  • Kanelbullar croissants

    Kanelbullar croissants

    There was that weekend, many-many months ago. I had told you about the days when blogs were not so editorially perfect and how I miss them; about the two crumpets with raspberry jam that I had had for an early afternoon breakfast; and about how we’d moved the kitchen table by the window and took way too many pictures.

    Because, you see, my book was coming out the day after. And I guess that – as pretty much the entire universe – when I’m about to step in the unknown I like to delve a bit deeper in my comfort zone.
    It might be just a breath. Or as it happened, it might be croissants.

    There is this one thing I know for sure though. It’s that there are many rainy weekends ahead of us. And really, I thought I’d take you with me.
    A time machine of some sorts.

    Making the détrempe under the grey light of a drenched morning.
    Rolling turns later that day during the blue hour.
    And waking up to gold through our windows to finish shaping the croissants.

    By twelve, we had hot coffee – much hotter than I’d usually care for, and freshly baked croissants. And perhaps, you’ll have some too.

    This recipe doesn’t make traditional croissants. But more of a beautiful cross between a kanelbulle and a croissant. Soft and slightly flaky, as I only gave the dough two simple turns, as opposed to my usual croissant routine: three simple turns. In fact, a look at the insides will give it away: the membranes are thicker, and cinnamon speckles dot them throughout.

    Perhaps, if you want to, I could make some regular flaky croissants, just like the ones I grew up on, and show you too. Yes, croissants are nothing new. But I guess, in the constant chaos that surround us all, there is still some wisdom left.

    The ingredients.

    For the détrempe
    300 g strong flour
    200 g plain flour
    80 g caster sugar
    12 g instant yeast
    10 g milk powder
    10 g sea salt
    250 g cold water
    45 g butter
    , melted and cooled down

    For the butter
    300 g unsalted butter, at room temperature
    2 tbsp ground cinnamon

    For the glaze
    200 g icing sugar
    boiling water
    seeds from one vanilla pod


    twelve pm.
    Mix the flours, sugar, yeast, milk powder and salt in a large bowl. Add the cold water and butter; and mix until a dough starts to form.


    ten minutes past twelve pm.
    Transfer the dough to a clean work surface and knead for around ten minutes or until the dough feels elastic and smooth.


    twenty minutes past twelve pm.
    Place the dough back in the bowl and clingfilm tightly. Leave in a warmish place for an hour or so, or until doubled in size.


    twenty-five minutes past twelve.
    While the yeast is working in magic, work yours with the butter. In a bowl, mix the soft butter (you could flash it in the microwave for ten seconds at a time until soft but not melted) with the ground cinnamon. Perhaps a pinch of cardamom too.


    half past twelve.
    Scrape the butter onto a piece of piece of baking paper and top with another one. Roll it until you get a rough 40x30cm rectangle. Transfer to a baking tray and chill in the fridge.
    Have a cup of coffee. And kisses. And maybe, even tickles down your neck. I highly recommend the latter. That’s what dream-Sundays are made of.

    half past one.
    The détrempe is proved when it’s almost doubled in size. When you take it, it will be very smooth and elastic.

    half past one.
    Place the détrempe onto a lightly floured work surface and roll into a rough rectangle. Wrap in clingfilm and freeze for twenty-five minutes to stop the yeast. Then transfer to the fridge and let it be for a few hours.

    five o’clock.
    Tea time for some. And feuilletage for others. I can’t help but feel a little sad for the former who’ll never know the calmness only rolling dough can bring.
    Take out the butter sheet on your bench to soften it ever so slightly. Place the détrempe onto a lightly floured work surface and roll to a 40x60cm rectangle. Flour more as needed but always make sure to brush off the excess afterwards.

    ten past five.
    Place the rectangle of butter on the lower half of the détrempe – patching it as you do so to cover any naked corner – then fold the upper half over.

    fitfteen minutes past five.
    Flatten the dough with your hands to get rid of any air bubbles, and rotate counter-clockwise so that you have a “book” its spine on your left hand-side.


    twenty minutes past five.
    Roll the dough before the first turn.

    For that, I like to press my rolling pin into the dough to create some indents. This step – if done gently yet with sufficient pressure – allows to distribute the butter evenly.
    I then start rolling the dough in long movements, from the centre up and then from the centre down. Those two techniques can be applied to any laminated dough.
    If the dough starts to stick, don’t hesitate to flour your work bench and reposition the dough.

    twenty-five minutes past five.
    Once the dough has been rolled to – ideally – around seven millimetres, brush off any excess flour, and fold in three, like you would do with a letter.
    This is a tour simple [simple turn].

    Wrap the dough tightly in clingfilm and chill in the fridge for at least an hour.

    twenty-five minutes past five (of the am kind).
    I went for another simple turn as I’ve told you before. Because fluffy meant something special to me that day, or so it seems.
    Of course Karl wouldn’t wake up, so pictures didn’t happen, but here is what I did: I rolled the dough to around seven millimetres thick, then folded it in three, exactly like shown above.
    After that, I placed the dough back in the fridge – again, wrapped in clingfilm.
    If you wanted a flakier texture, I would advise to go for another tour simple [simple turn] now.

    half past six (of the am kind).
    Get two baking trays lined with baking paper.
    Roll the dough on a lightly floured surface to a rough thirty-centimetre-wide rectangle. Cut the dough in half width-wise (if that’s even a thing) and place one half onto one of the prepared baking trays. Chill while you get on with the other half.
    This will make the dough easier to handle and roll thinner, while the other part stays cool.

    Keep on rolling the dough, maintaining a width of around thirty centimetres, until it’s about four or five millimetre-thick.
    Cut triangles using a sharp knife, making sure their base is eight to ten centimetre wide.
    As you cut the triangles, place them onto the prepared baking tray; and keep in the fridge until needed.

    Repeat the rolling and cutting process with the other half of dough.

    seven am.
    Get two baking trays lined with baking paper.

    Take out a couple of dough triangle out at a time. Gently stretch them, then roll without putting any pressure on the layers. And place them with the “point” underneath on the prepared baking tray, generously spaced out.

    twenty minutes past seven.
    Layer two large pieces of clingfilm, chasing any air bubbles and lightly brush with vegetable oil.

    twenty-five minutes past seven.
    Place the layered clingfilm – oiled side down – on top of your croissants, to cover them loosely. Allow to prove at room temperature for around two hours or until wobbly and doubled in size.
    If butter starts leaking, then you might want to find a slightly cooler place to prove your croissants. If I’m at the restaurant, then 26°C is the temperature I go for (with 65% humidity for the ones of you who are lucky enough to have a prover).

    Once the croissants have proved, brush gently with a beaten egg, making sure not to put any egg-wash on the cut edges, which would prevent the rise of the feuilletage.

    Bake at 200°C for seventeen to twenty minutes. Allow to cool down slightly, then transfer to a wire rack.

    ten thirty.
    Make the sugar and vanilla glaze: mix the icing sugar with enough water to form a pourable icing; stir in the vanilla seeds, and drizzle over the croissants.

    THE END. Of life as you knew it.

  • Zimtstern à la cannelle

    Zimtstern à la cannelle


    We found a tree, just a few nights before Christmas. A bit of a happy coincidence. Not that we hadn’t looked everywhere before. Sold out or cheap plastic.

    And there it was, still wrapped in some sort of net. We named it Charlie; forgot about the pizza we’d set off to eat, and proceeded to carry it home on K’s shoulder across London. We stopped at the shop, the one around the corner, and got a pizza there. Twenty minutes later, we sliced into it, and later that night, we let the multi-coloured lights (with a green chord and cone-like bulbs; that remind me so so much of the ones my grand-mother brought back with her and her children when they moved back from Tahiti to France) lullaby us to sleep.

    And at that exact moment. With the twinkling lights and the smell of forest filling our room. That was Christmas. My Christmas.

    But really, I’m not sure why I’m telling you that.

    You see, I had amazing plans for this year. I wanted to share with you my favourite – old and new – recipes for biscuits to bake during those nights made of wool socks and candles and mulled wine and peeks through the window wishing for snow.
    But before I even knew it, Christmas had well gone. Not that we still have Charlie in our bedroom. Perhaps, we’ll go to the park at the end of our street one night, and dig through the earth to make him a new home.

    So we’ll have to make it an extended Christmas this year. Recipes from another time for the one to come maybe; if you don’t mind.

    After all, I went to every possible shop to find the perfect star cookie cutter. Buying anything star-shaped that came my way. And I no have many. Possibly six too many.
    One thing I know for sure though, you won’t have too many zimtsterns. Ever.

    Zimtstern à la cannelle
    Adapted from Mingou’s beautiful zimstern (via Pauline, the must-visit source for anything Christmas biscuit related)

    Just like we’re not in Kansas anymore, Christmas is far gone. However, as I write this, a couple of weeks after it all happened (for us, it was a delicious lunch at the pub with a little too much wine and a lot too-much laughs), I’m snuggled in bed with Ash in my ears and the comforting thought of many biscuits – cut and arranged in plastic containers – ready to be baked at any time. In fact, as long as we have Charlie on and a wreath on our door, I’m not planning on giving up on the holidays.


    Zimtstern(s?) are new to me. And really, when I first saw them, I knew they were going to be something special. Beautiful chewy, with a subtle cinnamon flavour. A bit like a macaron and yet not quite.
    Mingou’s recipe isn’t traditional as it calls for flour. I guess it makes them a little bit cakier (in a good way) and way easier to work with.

    I made the soft dough and rolled in – still in between two sheets of baking paper – then cut it and baked it for barely ten minutes. As Mingou says, it’s definitely better not to overbake them as they’ll turn quite hard. The edges will just start to brown slightly when they’re ready.

    As they cool down, make the glaze, a simple royal icing; I wanted to add vanilla, but then I forgot, although it would make a lovely finishing touch. Next time, tomorrow perhaps?

    When it comes to dipping the biscuits in, place them in the icing, then go up and down to get rid of the excess. Finally you can tap the biscuit slightly on your table to smooth the glaze.

    Zimtstern à la cannelle

    Makes around 50 small biscuits.

    200 g ground almonds
    100 g icing sugar
    60 g caster sugar
    3 tsp ground cinnamon
    1 tsp maldon sea salt
    160 g plain flour
    2 egg whites

    Preheat the oven to 150°C and line two baking trays with baking paper.

    In a bowl, combine the dry ingredients. Add the egg whites and mix until it forms a dough. Roll in between two sheets of baking paper to around 8mm thick. Cut out using your favourite cutter, from what I’ve seen, the must is a six-point star, something that seemed to be absolutely unfindable in my corner of the world.
    Arrange the biscuits onto the prepared baking trays and bake for around 10 minutes, or until slightly puffed up and the edges just begin to brown (ever so slightly).
    Transfer to a wire rack and allow to cool down completely.

    For the royal icing

    2 egg whites
    380 g icing sugar
    seeds from one vanilla pod

    Prepare the icing by mixing the egg whites with the icing sugar until smooth. It should be soft to touch, but not too runny. Gently dip the top of one biscuit into it, then remove, allowing the icing to drip for a couple of seconds. Place back onto the baking sheet, iced-side up. Repeat with the remaining biscuits and allow them to set at room temperature for a couple of hours.

    The zimtsterns will keep in an airtight container for a couple of weeks.

  • Biscuits croustillants à la cannelle

    Biscuits croustillants à la cannelle

    [Crisp cinnamon biscuits]

    I don’t want fig leaf or oak bark infusion. I don’t want gimmicks and royal icing where it’s not needed. I want to explore flour, sugar, butter and eggs.

    Give me cinnamon. And whole wheat flour. Oats. And dark brown sugar.

    I want to look underneath a biscuit. And see a golden colour. And little ridges. And above all, I want to build a collection of solid recipes for the years to come. For traditions that don’t exist yet, but will. And for those that are already there.

    Yes, at times, I love to experience with crazy flavours. The next big thing. Or more. But as I’ve told you yesterday, for me, Christmas is all about rituals and beautiful habits. I hope you feel the same way.

    Biscuits croustillants à la cannelle
    Adapted from Trine Hahnemann.

    When it comes to a biscuit texture you can get: crisp, crunchy, sandy/short, caky or chewy. These ones are full-on crisp. A beautiful texture which makes them – perhaps – the best biscuits I’ve ever eaten.
    So much, in fact, that this year, I’ve decided to forgo my usual vanilla shortbreads and use this recipe as a base instead. Maybe try different shapes, perhaps even thumbprint cookies and see how that goes.

    I think their insane texture comes from the initial sanding technique, when the butter gets rubbed into the flour and sugar, which created beautiful layers within the biscuit. So I might experiment with this instead of the usual creaming that most of my biscuit recipes use.
    They also make me want to try more of Trine’s recipes. Have you ever? If not, then please, make a batch of these.

    As I usually do, I rolled the dough between two sheets of baking paper (but as I mentioned yesterday, it makes me miss the feuilles guitare I use at the restaurant, SO. MUCH. BETTER.) as soon as it gets made, and then go on with the chilling. I’ve found that resting the dough before rolling doesn’t improve the texture, and really, makes it so hard to roll that you have to 1) bash it with a rolling pin to make it somewhat workable or 2) let it outside to warm up a bit (hence, erasing all the benefits of keeping the dough cold at all times: making the water content of the butter less available for gluten to bind).

    Two or three important things though when it comes to rolling the dough.
    – always roll in different directions.
    – every now and then, lift the baking paper and smooth any wrinkles out. They tend to make the dough fragile and the biscuits less pretty.
    – before you cut out your biscuits, remove the top layer of baking paper, then place it back (it won’t stick as much), before filliping around and removing the second layer of baking paper. This way, as you cut out, the shapes will stay in your cutter, instead of sticking to the paper (hope that makes a semblance of sense at all?!).

    Also, re-rolling the trimming? I would usually say it’s a big no. But f*ck it, it’s home baking after all.

    Biscuits croustillants à la cannelle

    makes around 30-40 biscuits

    For the dough
    375g plain flour
    125g light soft brown sugar
    1 tsp baking powder
    1 tsp ground cinnamon
    1/2 tsp sea salt
    250g cold butter
    , cubed
    one egg

    For the sugar topping
    one egg, beaten
    100 g demerara sugar
    4 tsp ground cinnamon
    gold shimmer powder
    , optional

    Mix the sugar, cinnamon, and gold shimmer (if using) to combine.

    Place the flour, sugar, baking powder, cinnamon and salt in a large bowl, and mix to combine. Add the butter, and rub it in the flour mix until it resembles coarse oats. Add the egg and work the dough until just smooth.
    Roll the dough between two sheets of baking paper until it’s around 4-5mm thick.
    Place on a baking tray that fits in your fridge, if the dough is too large, you can cut through the paper to make two or more rectangles. Chill the dough overnight.

    The next day, cut out your biscuits using either a round 5cm cutter or different shapes, and place on a large sheet of baking paper. Brush with the beaten egg and sprinkle generously with the cinnamon sugar. Shake off the excess and place on a baking tray lined with paper. At this point you can either freeze the biscuits for a month or so, or bake them straight away.

    Preheat the oven to 170°C. Bake the biscuits for 14-18 minutes, depending on their size. They’re ready when evenly brown. Allow to cool down completely and keep in an airtight container. Trine says they’ll keep for a month. If so, my dreams of the perfect biscuit have come true.

  • Gluten-free chocolate fondant cake

    Gluten-free chocolate fondant cake

    I wish you were here with me. Sat on the patio. There is a wooden table which I’ve slowly taken over: notes, drawings of mushrooms, a mug holding watercolour brushes, a mismatch of cameras, and a cup of coffee hotter than what I would normally fancy.

    From where I sit, I can see the logs Karl brought from the little shelter down in the garden on the same wheelbarrow we used to collect the hay that his father – Svante – cut on the day we arrived. They’re neatly piled and possibly enough to keep the fire going for a good week.

    There is two pairs of rain boots – my new favourite, as they will take me anywhere.

    And then, there is the forest. All around us.

    This morning, we saw the same hare I fell in love with yesterday. Hopefully, he’ll stick around here a little longer. Svante told me he probably had his eyes on the apple tree that stands right in the middle of the garden.
    But secretly, I think we’ve become some sort of wild friends.

    Yes, right now, I wish you were here with me. Listening to the sound of the forest after a rainstorm.
    It’s, perhaps, the most beautiful thing I’ve ever heard. The lightest raindrops hitting the moss. The cracking branches. The birds’ songs, and the happy merry-go-round of bumblebees. The wind going through soaked leaves.

    The house is quiet. Aside from an old timer ticking seconds like others tick boxes.

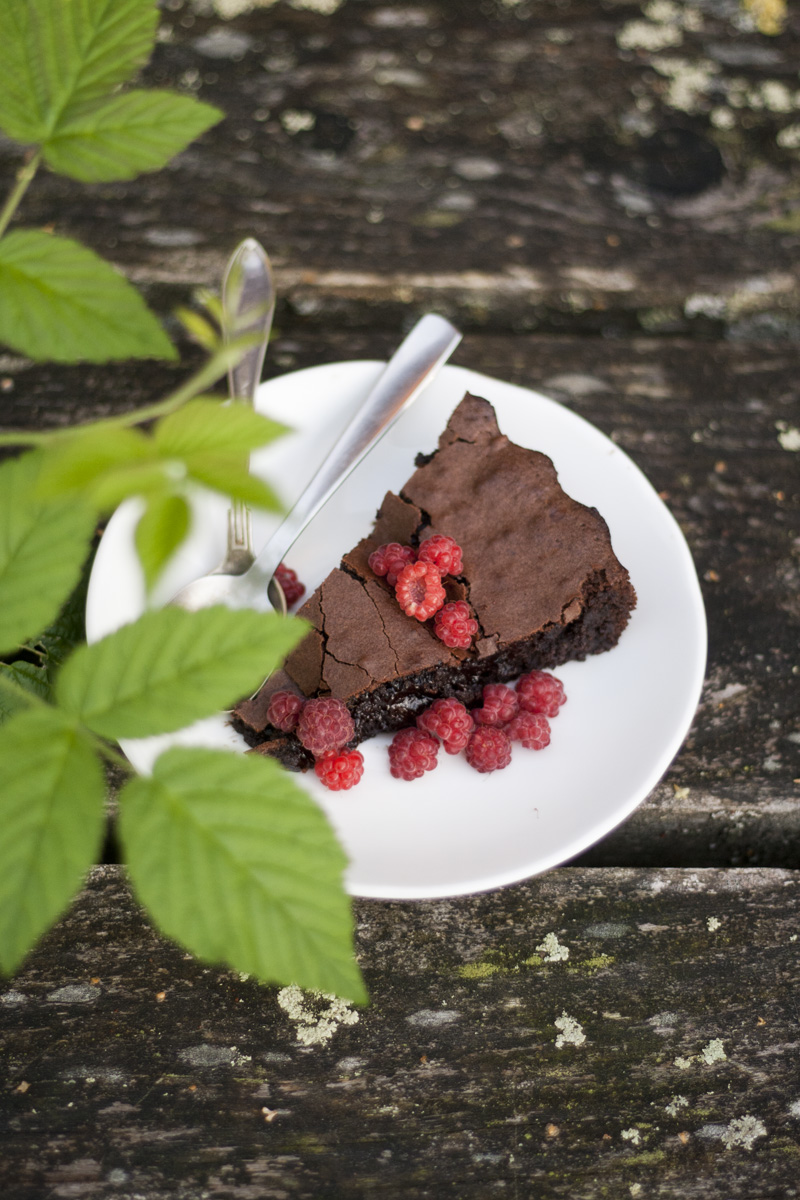
    You see, I have a gluten-free chocolate cake in the oven – hopefully cold enough by the time the boys will come back from their fishing expedition. The kind where coffee gets boiled over a bonfire and knee-high neoprene boots make you belong to the river. The kind where, when Karl will be here, he’ll smell of burning wood and will have too many stories to share.

    And just like the house smelled wonderful yesterday as I was baking kanelbullar. It now smells of chocolate. And rain.

    Now a few hours later, I went to pick – tiny – hallon [raspberries] by the pond. And all the times Karl told me to check for worms inside the berries finally made sense.

    I cut myself a thick slice of the still-warm cake, fudgy around the rim and slighty gooey in the centre. And with a handful of my rather small bounty and a tall glass of filmjölk, it was just as delicious as I had hoped for.

    Gluten-free chocolate fondant cake

    You could make this cake with ground almonds only, but I couldn’t resist to try the gluten-free oat flour I found at the supermarket a few days ago.
    The process is very simple. Not unlike a classic fondant cake.

    The eggs and sugar get whisked together for a few minutes, until the sugar has almost dissolved. Then the melted chocolate and butter get folded in. And finally the flours. A quick trip in the oven; and voilà!

    Gluten-free chocolate fondant cake

    200 g 70% dark chocolate
    250 g unsalted butter
    5 eggs
    250 g caster sugar
    50 g ground almonds
    40 g GF self-raising oat flour
    8 g sea salt

    Preheat the oven to 180°C, and generously butter a 26cm cake tin.

    In a heatproof bowl, melt the chocolate and butter; either in a microwave or over a pan of simmering water. In a large bowl, whisk the eggs and sugar for around 4 minutes, or until fluffy and almost doubled in size. You don’t want to overdo it, it’s just a matter of dissolving the sugar.

    Fold in the chocolate mixture, mixing well. And finally add the ground almonds, oat flour and salt. Pour into the prepared tin and bake for 24-28 minutes, until barely jiggling in the very centre of the cake.

    Allow to cool down completely before slicing. Or scoop while warm, like I did.

  • La rhubarbe

    La rhubarbe

    I remember the rhubarb my grand-père used to grow in the garden. It was thick and green; and would be turned into jar-after-jar of compote which my grand-mère always kept in that little cupboard in the garage. On top of my grand-père’s tools, always neatly organised.
    One day, I’ll show you that garage.

    We would eat the compote on top of yoghurt for breakfast. Or spoon it onto a tart case and cover it with a creamy custard before baking.

    Compote de rhubarbe

    Rhubarb compote is one of those staples you can never have enough of. Wash the stalks under cold water, then chop into 1cm pieces. Weight out the rhubarb in a large bowl and combine with 20% of caster sugar. So let’s say, for 1kg of rhubarb, add 200g caster sugar; and of course, the seeds and empty pod from a vanilla bean. Mix well, cover with cling film and leave to marinate overnight in the fridge.
    The next day or a few hours later (cheeky version), scrape the fruits into a large pan and cook over medium heat – stirring every now and then, more so often towards the end – until the rhubarb has broken down and the syrup has reduced.
    If you’re canning, transfer to sterilised jars, close the lids and turn upside down before steaming for 30 minutes. Otherwise, just transfer to a plastic container and refrigerate until cold. You’ll have to use it within 5 days.


    And then, I moved to London, where rhubarb is pink and only comes when the trees are snowing with blossoms. It’s my favourite time of the year really.
    And my favourite colours too.

    These days my favourite thing to do with rhubarb is to roast it in a vanilla syrup.

    Rhubarbe rôtie

    In a large pan, bring 300g of water and 300g of caster sugar to the boil, along with the seeds and pods from 3 vanilla beans.
    In the meantime, wash and cut 500g of rhubarb stalks into 3cm pieces and place them into a large roasting tray. Cover with the syrup and bake at 200°C for around 10-12 minutes. Allow to cool down to room temperature.


    I like to serve it on top of a cake. Perhaps with frosting, perhaps without.
    But in all measures, it should look messy and naughty. Because that’s what cakes are for.

    For the record – because I’m trying to learn Swedish, one food word at a time, and also because when we were there, I saw the biggest rhubarb bush I had ever seen before, in his dad’s garden, and also because it’s a good-mood word* – rhubarb in Swedish is:

    Rabarbrar
    Rabarber

    * Please tell me I’m not the only one who falls in love with some words. For the way they sound or look.

    What is your favourite way of using rhubarb? And any little stories we should all know about?

  • Un gâteau aux pommes et au cidre

    Un gâteau aux pommes et au cidre

    [A cider and apple cake, not unlike a tatin tart]

    There was a night made of champagne, flickering candles, crisps and smoked salmon sandwiches, the last of the foie gras smothered onto big fat chunky pieces of baguette, an endless game of trivial pursuit where – as it turned out – the one person who refused to play (my father, apparently stuck to his mots croisés) became the one who knew all the answers, our joker – as we called him.

    Yes, there was no electricity in the house after a storm hit the lines, somewhere around Marseille. But we had us. And a dark Christmas tree. And some apple cake.

    Something I’d thrown together with things we had.

    Too-much-butter, as my mum always buys when she knows I’m coming.
    A lot of sugar.
    A touch of honey from this beekeeper my grand-mother became very fond of.
    And winter apples from M. Riouet’s orchard. And really, I say orchard when it really is just a couple of trees, but I can’t help it, his potager is the enchanted forest I grew up in.

    This cake was meant to be nothing but rustic. A mere snack after a day spent with Bruno and his goats in the mountains.
    And yet, that night, it turned into something special. Here is to power cuts! And to the new year too!

    Gâteau aux pommes et au cidre, un peu comme une tarte tatin

    While I wouldn’t necessarily force you to have this cake as a dessert, I must say it makes a pretty decent contender. Especially with a scoop of yoghurt ice-cream or a generous dollop of crème fraiche.

    But the way I see it is much more homely. The kind of cakes that’s eaten still warm from the oven, with fingers and a side made of tea in a pot. I think a light infusion of tilleul would do wonders here.

    It’s really quite simple to make. Slice three apples thinly, a knife and your hand are enough, but you can go with the mandolin too, although I didn’t. Layer them at the bottom of your tin and drizzle with honey. Top with the batter and bake. Oh, and eat too!

    Gâteau aux pommes et au cidre

    serves 8-10

    6 apples, peeled and cored
    100 g runny honey
    180 g butter
    300 g demerara sugar
    2 eggs
    245 g plain flour
    2 tsp baking powder
    1 tsp ground cinnamon
    1 tsp maldon sea salt
    180 g apple cider
    (or apple juice)

    Preheat the oven to 190°C/fan 180°C.
    Butter a 24cm cake tin, line with baking paper and set aside.

    Thinly slice 3 apples and layer at the bottom of the prepared tin. Drizzle with honey and pack tightly with your hands.

    In a large bowl, cream the butter and sugar.

    In the meantime, chop the remaining apples into 2cm chunks.

    Add the eggs one at a time, mixing well after each addition. In another bowl, combine the flour, baking powder, cinnamon and salt.
    Then, alternatively add the dry ingredients and cider to the butter mixture in three times, starting with the flour.
    Finish the batter by gently folding in the apple chunks.

    Pour onto the sliced apples and bake for 45-60 minutes, or until a cake tester inserted into the centre of the cake comes out clean. Allow to cool for a few minutes, then invert onto a plate and peel off the baking paper.